Friday, 3 June 2022

BCD (Boot Configuration Data) - How to set boot entry

Windows Boot Manager (BOOTMGR) is a utility that boots operating systems. If you have several operating systems, you can enable Windows Boot Manager when the computer boots and then select the target operating system.

To add more operating systems to the boot manager refer to How to Multi-Boot Two or More Versions of Windows

Boot manager started since Windows 7. This is how the Windows 7 boot manager looks like.


The boot manager has changed its look since Windows 8 and beyond.


When a new operating system has been added, the computer will start booting from the new boot manager of the latest operating system. The default boot entry will be set to the new operating system also (refer diagram below). If it is necessary to reset the boot manager back to the previous operating system.


How to set default boot entry

I am using Windows 7 as the 1st and Windows 10 as the 2nd booting option.

I prefer to use Windows 7 as the default boot manager because Windows 10 is used as software test platform. Sometimes it is necessary to reinstall Windows 10 again because some test software might corrupt the Windows 10. 

Below is the example to set the default boot manager back to Windows 7

www.backupassist.com/blog/how-to-fix-boot-issues-with-bcdboot

Make sure Windows 7 is the current running operating system. 

18/Nov/2024 Not neccessary to boot into Windows 7 in order to set the boot loader to Windows 7 itself. A Windows 11 was installed & Windows 11 boot loader was used but when Windows 7 was login few seconds later it will stop and display the blue screen.

Setting the boot loader to Windows 7 using "bcdboot (drive no using list volume of diskpart for Win 7):\windows" manage to start Windows 7 normally.

Open the command prompt and run as administrator. Run diskpart. Find out which volume belongs to Windows 7. For this case the Windows 7 volume is 'E'. Exit diskpart and type "bcdboot e:\windows" than enter. Now command prompt should show message "boot files successfully created".


How to remove boot entry

docs.microsoft.com/en-us/windows-server/administration/windows-commands/bcdedit

BCDEdit – Guide for Windows Vista, 7, 8, 10

BCDEdit is a command-line tool for managing BCD stores and the primary tool for editing the boot configuration of Windows Vista and later versions of Windows. It is included with the Windows Vista distribution in the %WINDIR%\System32 folder

Administrative privileges are required to use BCDEdit to modify BCD.

Syntax

bcdedit /command [<argument1>] [<argument2>] ...

Open the command prompt and run as administrator. Type "bcdedit" without argument is to list the computer's current BCD configuration.

To delete a boot entry type "bcdedit /delete {identifier}"


How to add a new operating system to the boot manager

Insert a bootable Pendrive or DVD of the Windows version to install and restart the computer. Let it boot from the external device.

Choose all the default setting when prompted until the selection of Windows installation type. Then choose Custom - New installation and select the partition to install the Windows. Wait for the installation to be completed.

Note: After the installation the computer will use the boot manager of the latest Windows.


How to add an existing Windows to the boot manager

Boot into the default Windows, open the command prompt, run as administrator, Type "bcdedit /copy" to make a copy of the current boot entry.

Type "bcdedit /copy {current} /d "Windows name" and then pressing the "Enter" key. 

The new boot entry will be added to the boot manager. Type "bcdedit" again without any parameter to see a list of boot entry. The new boot entry is still boot to the current Windows, ie partition C:. Take note on the new identifier, device, description and osdevice . Use /set to change the setting in the new boot entry to boot from the target Windows. For example, if the target Windows is in partition K, change the device and osdevice to "partition=K:".

bcdedit /set {identifier} device partition=K:
bcdedit /set {identifier} osdevice partition=K:
bcdedit /set {identifier} description "Windows 10 Pro x64"

Restart the computer. The new boot entry should work now. 

System Reserved partition - Space not enough

What Is the System Reserved Partition and Can You Delete It?

Windows 7, 8, and 10 create a special “System Reserved” partition when you install them on a clean disk. Windows doesn’t normally assign a drive letter to these partitions, so you’ll only see them when you use Disk Management or similar utility.

The System Reserved partition contains two important things:

  • The Boot Manager and Boot Configuration Data: When your computer starts, the Windows Boot Manager reads the boot data from the Boot Configuration Data (BCD) Store. Your computer starts the boot loader off of the System Reserved partition, which in turn starts Windows from your system drive.
The System Reserved partition consumes 100 MB of space on Windows 7, 350 MB of space on Windows 8, and 500 MB of space on Windows 10.

During the new Windows installation when the target partition has enough disk space but the Windows keep refusing to install because it claim the system space is not enough, reboot to the working Windows, ie Windows 7, and shrink the Windows partition or any partition by 500MB then add extra size to the system reserved partition. Now the installation should works fine.

Link for more info about Windows Boot Manager

Friday, 20 May 2022

NAS Synology DS-107e - Power up again

Device : Synology DS-107e

Capacity : Single drive 500GB.


Upgrade


This device was used as a file backup for the local computer and also intended to build a web server. It was shut down few years ago due to the slowness internet speed, 8Mbps, which was not adequate for a web server. 

After the device was power down the file backup is to continue on external USB hard disk. 

Now this device has been replaced with a used SEAGATE ST7350640NS 750GB hard disk to maximize the device's capacity.

It is connected to the router by LAN and router is connected to the fiber-optic internet 100Mbps.

The old 500GB Linux partitions (Ext2) were copied to another hard disk as backup and the partitions were deleted in order to create a new NTFS partition to install Win 10 for network test. 

Note that when the Linux partitions (Ext2) were copied back to the 500GB hard disk and when the hard disk was installed back to the device, the device cannot boot from the hard disk. The reason being the Linux mbr has been overwritten by the Win 10 mbr. Therefore files can only be retrieved using software that can connect to the backup Linux partitions.


Connecting to device.

Connecting to the device was a bit complicated. During the 1st power on the device will spend time looking for a DHCP server to allocate an IP (the router must has DHCP enable). It may take a while for the device IP to become available.

Once the LAN light became stable (flashing at first than solid after stable), run the Synology Assistant (must have installed on the computer) to search the device IP. 

If the device cannot be found, login to the router software management or use other network IP detection software to search the device IP. 

Once the IP is available just type in the IP and get to the device or use Synology Assistant and highlight the device name in it then click connect to connect to the device.

The device will prompt for the DSM file to be installed and in this case find and use the 'DSM3.1-1639.PAT' v3.1639 saved in the computer folder. 

The DSM will take sometime to install and when it is ready, type or click on the same IP will open the DSM in the default browser. 


How to set up your Synology NAS


Login to DSM (default user is 'admin' and password is blank) to start setup the server now.

If the device really cannot be found, set the router IP to 192.168.1.1 (most common use IP by Synology server) and enable DHCP. Restart the router and restart the device and most likely the device to automatically get assign an IP by the DHCP server. Then repeat the steps in connecting to device again.

Synology-DS107e Router Setup

How do I find my Synology NAS via Web Assistant or Synology Assistant?

Synology DS107e Router Login Information


Problem mapping drive with Windows 10

When mapping drives in Synology Assistant on Windows 10 an error code 384 will occur. Previously the device is connected to Windows 7 and the mapping drive has no problem.


Some web explain the problem as follow. Paessler Synology Error Code 384 

This problem occurs because the SMB 1.0/CIFS File Sharing Support has been deactivated on Windows 10, Windows 10 Fall Creators Update version 1709 and higher.

The SMB 1.0 protocol is important for the Computer Browse service to populate the Windows Explorer Network node ("Network Neighborhood"). This legacy protocol does not route, has limited security and is long deprecated. As this service does not work without SMB 1.0, it is removed when SMB 1.0 is disabled.

 Hint:

  • Open the search bar on Windows 10, type "Windows features" in the search bar and by double-click turn Windows features off and on
  • Look for SMB 1.0/CIFS file sharing support
  • Check if the box and all others will auto populate and click OK
  • Restart your computer

Now the mapping drive in Synology Assistant should works on Windows 10.

DSM newer version than v3.1639 should be able to set the SMB in the server itself.


Connect to the Linux partition in Windows

To connect to the Linux partition in Windows and retrieve files, software like Linux reader, ext2explore

and Ext2Fsd can be used. Ext2Fsd, Ext2 Volume manager, is prefer since it can assign a drive letter to the Ext partition. 


To copy the files back to the device use the Fastcopy software where the timestamp of the file and folder can be copied as well.


Reset Synology NAS

www.howtogeek.com/344497/how-to-factory-reset-your-synology-nas/

1.    Reset Network Settings

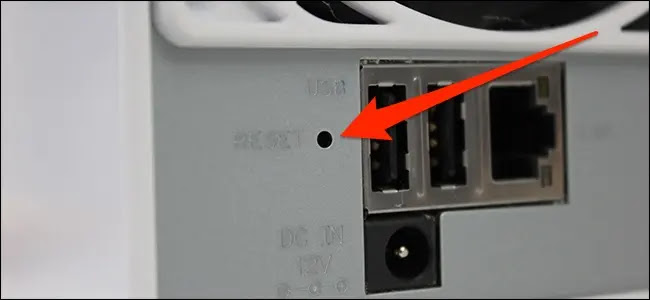
Locating the reset button on the back of the NAS drive.


Use a paper clip and hold down the reset button for about five seconds until you hear a beep. Then let fo immediately.

After that, fire up Synology Assistant, and then double-click the NAS drive to access it and login.


The default username is "admin" and the default password is left blank. Click "Sign In' after entering in these credentials.


2.    Reinstall DSM, but Keep Data

Completely resetting the DSM operating system, but still keeping all of their data intact. This is great for DSM giving some issues and you just want to wipe and start fresh.

Locate the reset button on the back. Use a paper clip and hold down the reset button for about five seconds-until you hear a beep. Then let go immediately. Right after that, hold down the reset button again for five seconds until you hear another 3 beep. Let go immediately after that.

The NAS will reboot. After a couple of minutes, the status light will blink orange. DSM is now ready to be reinstalled.


Open up Sunology Assistant, and double-click the NAS drive to access it (it will say "Configuration lost" next to it).


Click the "Install" button.


Setup Wizard


Installation file


DSM_DS107e_1639.pat


Leave blank for password


Network setup - get from DHCP


Formatting partition


Installing DSM


Rebooting


System has been installed successfully

Login to DSM


DiskStation is ready

To add images into blogger side by side watch www.youtube.com/watch?v=DkvND3q_3C4


11/Jun/2022

More info about setting of NAS.

Thursday, 19 May 2022

Computer upgrade

Motherboard : Gigabyte G41MT-S2P

Processor : Intel Core 2 Duo E7400 2.80GHz/3M/1066/06 (Old)

                 : Intel Core 2 Quad Q9400 @ 2.66GHz 2.67 GHz (upgraded 06/May/2022)

Ram : 4GB

Disk : 128GB Kingston SSD

         : 2TB WD HDD

         : 500GB SEAGATE HDD

OS (Multiboot with BCD - Boot Configuration Data)

         : Windows 7 Home Premium SP1 32Bit

         : Windows 10 Enterprise 64Bit


Sunday, 1 August 2021

VMware Workstation 15 PRO 15.1.0, Cannot copy file from Host machine to VMware

2 days ago when copying a huge folder from the host machine to the guest VM some of the files failed to copy.  I then search the google and the suggestion is not enough disk space in the guest VM. A further check with the free space on the harddisk has confirmed the issue also.

https://communities.vmware.com/t5/VMware-Workstation-Player/Cannot-copy-file-from-Host-machine-to-VM/td-p/2699099

Then I shutdown the guest VM, edit hardware setting and wanted to expand the disk capacity but another message pop up saying 

'The called function cannot be performed on partial chains. Open the parent virtual disk.'

Another search in google suggested to delete all snapshot and if there is no snapshot just create one then delete it. 

https://communities.vmware.com/t5/VMware-Workstation-Pro/The-called-function-cannot-be-performed-on-partial-chains-Open/td-p/468948

So i just do what is said and then the disk capacity has been expanded as required.


Sunday, 11 July 2021

Your PC ran into a problem and needs to restart

Two days ago my Win 10 Pro 64bits suddenly pop up a blue screen showing to me the above message. Then it restart itself before I can finish reading the stop code description. Below is only an example from the internet search result.


Since I can't determine the cause of the problem and while i am still doing Windows maintenance and drivers updating,  I thought it could be related issues.

Then few days later it had happened 3 more times then I decide to check the cause of it. 

From this website https://www.partitionwizard.com/clone-disk/your-pc-ran-into-problem.html there are many more possible stop code. Here is some of them.
And sometimes the caused can be the followings:
  • Corrupted system file.
  • A registry file gets deleted from System32 folder.
  • Overheating problem.
  • RAM is running at a higher percentage than the operating system can accept.
  • Virus attack.
  • Forceful shutdown.
From the 1st cause it has reminded me of my recent fix on the virtual memory. I have tried to enable the custom size in the virtual memory to a larger memory so that Windows can run faster because of the issue on disk running 100% when a guest Windows has been powered on.

But the system has rejected it and i didn't bother to rectify the reason and just accepted the new setting. By going back to check the virtual memory it has been set to no paging file.

Open System Properties. Go to Advanced tab. Click Performance Settings.

In the Performance Options, go to Advanced tab. Click Virtual Memory Change button.


In the Virtual Memory the No paging file has been enable.


To reset it to auto, enable the Automatically manage paging file size for all drives at the top.


Now the windows will control the paging file size of the virtual memory. 

Since I have done that the problem never occur again for the last few days.


Update 15/Jul/2021

This evening Windows has encountered yet another blue screen again. I have managed to take a snapshot of it.


The stop code is SYSTEM THREAD EXCEPTION NOT HANDLED.

About an hour or two earlier i have seen an orange indicator in the Windows Start menu on the Power option for Shutdown and Restart and this means Windows 10 Pro has received an update and a restart is needed.

I was trying to complete some works and therefore choose to restart at a later stage. Maybe the new Windows update while pending for restart has crashed with an application that i was still using and therefore the blue screen was pop up resolve the problem.

Today is 17/Jul/2021 and after the restart the blue screen did not happen again and hopefully it has disappear forever.

😅

Monday, 28 June 2021

How to keep desktop icons from rearranging in Windows 10

When i plot my software from the old computer Windows 7 Home Premium 32bits to the new computer Windows 10 Pro 64bits 3 years ago, i have to install part of those 32bits software without 64bits version and others software with the new 64bits version.

Nevertheless i try to keep those desktop icons on both Windows which is almost 95% in the same position. I use Windows wallpaper theme auto change in both machine.

However, the Windows 10 desktop icons will sometime rearrange all the icons to the left screen after reboot or wakeup. As a result i will need to boot up the old Windows 7 as a reference to move those Windows 10 icons back to the original position. It has happened many times but i didn't fix it because its not a major problem and maybe some new 64bits software has changed the desktop icons by accident.

2 days ago it has happened again during a harddisk partition maintenance so i have decided to find a fix in google.

The search show a list of result where the 1st link has the solution.

https://support.lenovo.com/my/en/solutions/ht504726-how-to-keep-desktop-icons-from-rearranging-after-reboot-in-windows-10

Right-click on the Desktop, select View and unchecked the Auto arrange icons, reboot and the desktop icons has never been rearranged for many days. 

My best guess is that wallpaper theme is the culprit. The reason is simple because each picture in the theme may have different resolution and the changing of desktop pictures may invoke desktop icons rearrangement.


Sunday, 25 October 2020

I can't download from google drive

Today I was trying to download some files from a google shared drive in Chrome. There are folders and files in the drive. When I right click on the folder or the file i can use the context menu to do the download.

A message prompt will show preparing for the download.


Upon finishing Windows will open a local folder (previous saved folder) to save the download.

However, after the download preparation has been completed the save folder is never open. Thus none of those folders and files are able to be download.

This has happened couple of times before. Some download was omitted but other was managed to download. I cannot remember what i did to get those download successful. Nevertheless this time i will check why those download has failed.

Some suggestion from google search that maybe too many google account were signed in at one time (X-notifier extension installed for checking multiple email accounts). I log out from all the google account except one but still the download fail.

It looks like the download was blocked. I disable the ads-killer extension and its still the same. Another google search suggested that the cookie was blocked. And i saw in the Chrome setting that the Block third-party cookies was selected. 

Then i select the Allow all cookies and finally the download was successfuly.

But i still need to block third party cookies. I cannot set to allow all cookies then after the download reset to block third party cookies again which is so troublesome.

Than i thought maybe the cookie was blocked in that google drive. Sure enough there was an icon in the right side of the address bar that when the mouse hover over a text message will show 'Third-party cookie blocking'. 


When i click on the icon a Windows prompt show that the cookies has been blocked.

To unblock the cookies click on the 'Site not working?'. Another Windows prompt will show together with the option to allow cookies


When the option is selected the cookies will be allow for that google drive. 


That is all.


Wednesday, 21 October 2020

How to Move Off-Screen Window back On-Screen

 Today i switch on the Windows 7 PC which was setup for 2 monitor display before but now only use a single monitor.

When i start a program where it has displayed in the second monitor before now has became off-screen Window. I can't use the mouse to drag it back to the main monitor. 

From the Microsoft Bing search i have found some sites that do the trick, howto geek and tenforums

I use the simple trick as follow.

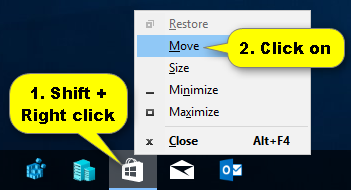
1 Press and hold the Shift key, right click or press and hold on the taskbar icon of the opened off-screen window (ex: "Store" app), and release the Shift key.

2 Click/tap on Move. (see screenshot below)

If Move is grayed out, then it means that this window is either minimized or maximized. Click/tap on Restore, and repeat steps 1 and 2.
Move Off-Screen Window back On-Screen in Windows 10-restore_window.png

Move Off-Screen Window back On-Screen in Windows 10-move_window.png
3 Your pointer will now turn into the Move Move Off-Screen Window back On-Screen in Windows 10-move_icon.png pointer. Perform either action below to move the off-screen window back on-screen where you want.

Press any arrow key, use your mouse or touchpad to move the off-screen window to where you want, and click/tap on the left button (primary) on the mouse or touchpad to drop the window.

That's it.


Sunday, 11 October 2020

New printer disappear in “Devices and Printers” after installed to Windows 10

I have just installed a new printer HPRT SL42 to Windows 10 but it cannot be seen in “Devices and Printer”.😨 The actual printer is not installed yet, only the driver is installed for software programming test.

However, i can still select them in the Printer list in Word, Acrobat, etc. Somehow the printer can be used but cannot be seen. This doesn't help because sometime i need to change certain properties in the printer like paper size and etc right from the "Devices and Printers".

I tried removing the printer by Revo Uninstaller Pro to get rid of all leftover in registry, restart Windows and re-installing the printer again. Still the printer cannot be seen.

Then I open the Device Manager in Control Panel and HPRT SL42 is in the Print queues.


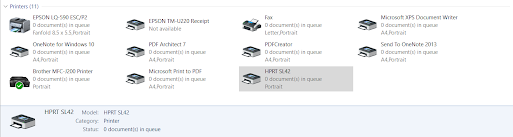
If i right click HPRT SL42 and select Properties, i can see that the Location for this printer is on Brother MFC-J200 Printer. This make me wonder that the printer link has been merged with Brother MFC-J200. To prove that i open the "Devices and Printer", right click on Brother printer and sure enough HPRT SL42 is in the option for Printer properties as well as some other option.


Now the question is how did this HPRT SL42 printer installed together with the Brother MFC-J200 printer? There must be some common hardware that shared by this 2 printer.

As i can recall when installing HPRT SL42 printer i have selected USB001 as the connection port and Brother MFC-J200 use the same port too. Then i open the Printer properties for HPRT SL41 and i saw USB001 was used by both printer.


To test if HPRT can be separated from Brother if i change the port, i tick the LPT2 as the new port now (I can't select another USB port since the physical printer is not connected yet and new USB port will not be added).

After i click the Apply and OK button, the HPRT SL42 finally appear in the "Devices and Printers".


How to Delete a Desktop icon with no properties

  In October 2024, I enabled Windows Subsystem for Linux (WSL) and installed Ubuntu on my Windows 10 system for an AI test project from Yout...