Friday, 5 July 2019

Error opening Help in Win 10: "Feature not included" or "Help not supported"

How to open .HLP files in Win 10

After upgrade from Win 7 to Win 10, while 2 days ago i was trying to continue with my program development, i have realised the programming .HLP files can no longer open. So as usual i google for more info and have found out Win 10 does not support .HLP files.

Info from the internet has suggested that many solutions are available.

https://windowsreport.com/open-hlp-files-windows-10/

https://answers.microsoft.com/en-us/windows/forum/windows_10-files/cant-open-hlp-files-with-windows-10/55ce10b8-e865-4c68-b2c8-c62318fe39b7

The 1st method is to decompile the hlp file (use HelpNDoc6 ) and than compile it to chm (use HTML Help Workshop) from Microsoft. However, i have encountered many problem like error in decompile large hlp file and unable to compile to chm file because of the following.

https://stackoverflow.com/questions/54219263/windowshelp-to-htmlhelp
http://www.help-info.de/en/Help_Info_WinHelp/hw_converting.htm

HelpNDoc6 cannot decompile a large 4.7MB hlp file.

Refer to http://www.help-info.de/en/Help_Info_WinHelp/hw_converting.htm, this site has suggested to use automatically create contents file (.hhc) when compiling but still doesn't work. Trying another method to use HHPmod to finishing up the HH workshop conversion finally able to create chm but the content is missing.

Also take note on this, sometimes there are problems using the context menu of a *.hhp file from Windows Explorer. (Open with Microsoft HTMLHelp Workshop). A DOS path quotation is the cause. Start HTMLHelp Workshop from the Start menu and use File | Open.

And converting from Winhelp to HTML Help leaves Bitmaps Behind. When you use the HTML Help Workshop to convert a Winhelp project to an HTML Help project, bitmaps in the .rtf files are not transferred to the HTML Help .htm files.

In addition when migrating from WinHelp to HTMLHelp there seems to be an issue with context sensitive help. It appears all this information is lost when converting is done?

The 2nd method is to convert hlp to PDF. This is a relatively simple procedure. But PDF does not has a contents menu and a index input column for wild search.

The 3rd method is to replace winhlp32.exe and winhlp32.exe.mui (for error 9009 which is to require for localization in your own language) from Win 8. Download 'Windows8.1-KB917607-x64.msu'. Do not install because it will display the update incompatibility message.


https://www.tenforums.com/general-support/16982-cant-read-older-hlp-files-windows-10-a-5.html#post529881 (post #46)

https://www.tenforums.com/general-support/16982-cant-read-older-hlp-files-windows-10-a-10.html (post #96)

https://www.tenforums.com/general-support/16982-cant-read-older-hlp-files-windows-10-a-6.html#post578103 (post #57)

https://www.tenforums.com/general-support/108565-how-open-old-hlp-files-windows-10-a.html (Search for a ready to download Help.rar to install winhlp)

https://www.trishtech.com/2015/12/how-to-open-hlp-winhelp-files-in-windows-10/

Now follow closely to this site https://blog.spectologic.com/2015/09/09/using-hlp-files-in-windows-10/. Some steps i use command prompt like taking ownership and other i use software ZipWare to extract files.

Extracte the content of 'Windows8.1-KB917607-x64.msu' to a temp folder (i create ContentMSU in Drive O) with ZipWare (freeware).

Create subfolder ContentCAB in ContentMSU and extract content of 'Windows8.1-KB917607-x64.cab' to ContentCAB. Go to ContentCAB to find subfolder amd64_microsoft-windows-winhstb.resources_31bf3856ad364e35_6.3.9600.20470_en-us_c3a9a33a1aee3495 as 'en-us' is my language settings. Go to the subfolder we will find 'winhlo32.exe.mui'. We need to replace %SystemRoot%\en-us\winhlp32.exe.mui (C:\Windows\en-us\winhlp32.exe.mui) with the new file.

In command prompt, change directory to c:\Windows\en-us. Than take ownship for winhlp32.exe.mui by command

https://helpdeskgeek.com/windows-7/windows-7-how-to-delete-files-protected-by-trustedinstaller/

takeown /f "winhlp32.exe.mui"

takeown /F <file_name> [/S <RemoteComputerName>] [/U <Domain\DomainUserName>] [/P <UserPassword>] [/A] [/R [/D prompt]]
Parameters of the takeown command:

/F <file_name>. Here you must specify the full path to the file or directory whose owner you want to change. You can use the wildcard character

https://theitbros.com/using-takeown-exe-command-to-take-ownership-of-file-or-folder/

Grant full control permission to winhlp32.exe.mui

icacls "winhlp32.exe.mui" /grant "%UserName%":F

https://ss64.com/nt/icacls.html

Rename existing winhlp32.exe.mui

ren winhlp32.exe.mui winhlp32.exe.mui.w10

Copy new winhlp32.exe.mui to current en-us folder.

copy O:\ContentMSU\ContentCAB\amd64_microsoft-windows-winhstb.resources_31bf3856ad364e35_6.3.9600.20470_en-us_c3a9a33a1aee3495\winhlp32.exe.mui winhlp32.exe.mui

(You can open windows folder to copy the file instead of typing command in command prompt)

For winhlp32.exe, it is the same procedure except source folder is C:\Windows

In command prompt, change directory to c:\Windows. Than take ownship for winhlp32.exe.

takeown /f "winhlp32.exe"

Assign permission to winhlp32.exe

icacls "winhlp32.exe" /grant "%UserName%":F

Rename existing winhlp32.exe

ren winhlp32.exe winhlp32.exe.w10

Copy new winhlp32.exe to current c:\Windows folder.

copy O:\ContentMSU\ContentCAB\amd64_microsoft-windows-winhstb_31bf3856ad364e35_6.3.9600.20470_none_1a54d9f2f676f6c2\winhlp32.exe winhlp32.exe

(Like above, You can open windows folder to copy the file instead of typing command in command prompt)

Now the hlp files should open successfully.

Thursday, 27 June 2019

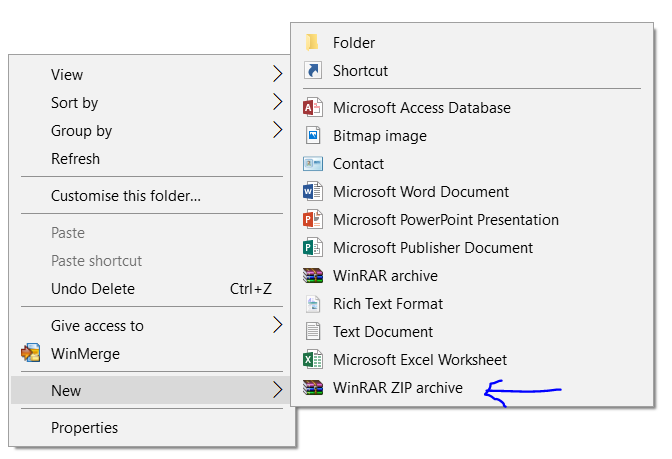
How to add WinRAR ZIP archive to Right Click context menu 'New' in Win 10

With WinRAR installed, the Window context menu 'New' will have option for WinRAR archive. Select this option will create new RAR file ready for adding archive.

To disable it, open WinRAR (Run it from C:\Program Files (x86)\WinRAR\WinRAR.exe if there isnt any shortcut) and choose Option -> Settings -> Integration than untick Integrate WinRAR into shell.


WinRAR also has another option to create archive, in zip format. But it is not added in the context menu. To add this entry to the context menu, i am using the window registry.


Open Window search box and type 'regedit'. Run regedit.exe when you see the command. Go to CLASSES_ROOT and find filetype '.rar' than click ShellNew to see the key FileName and data. Right click to modify FileName and copy the vaslue data 'C:\Program Files (x86)\WinRAR\rarnew.dat'.


Scroll down to find filetype '.zip'. Right click on '.zip' to add new key 'ShellNew'. Right click ShellNew to add a new string value. Change the value name to 'FileName' and paste the copied data just now to value data. Change the value data rarnew.dat to zipnew.dat. This will add ZIP option for New menu in Windows Explorer right click context menu. 

Quit the regedit.exe. If you don't see the new ZIP option now, restart the computer.

Wednesday, 26 June 2019

Synchronize folder timestamps

Now i have moved my working platform (Win7 x86) used for the last 10 years to newer machine (Win10 x64) and have used ViceVersa Pro to synchronize all the required directories and files in the partitions to the new machine.

All the softwares installed on the Win7 machine have been installed the same (some still use x86 version because x64 is not available and other download latest x64 version) to the new Win10 machine.

However, even though the timestamp for the files were synchronized correctly but not the folders. Most of the timestamp  in the new folder used the date and time when it was synchronized. This is not good because this group of folders (same timestamp) cannot tell the work progress by time.

Than the same miricle in google i came to this website providing the trick using robocopy which i did try some years ago but failed.

http://www.aionsolution.com/it-support/windows-7/robocopy-a-hint-for-those-with-folder-timestamp-issues-after-syncing/

Hence this is the command.

robocopy "(source") "(destination)" /dcopy:t /copy:t /s /log:(drive letter e:)mylog.txt /NDL


However there is a catch. The command will only syn the date modified and usually the folder detail viewer will only show a date column which does not match with the date modified. I do not know why but you only need to right click the folder viewer heading in order to show the date modified column for syn confirmation.

To generate mylog.txt greatly helps to determind whether there is error for the robocopy command. If mylog.txt has been created instantly, than there is some error.

Now my new folders are syn with the correct timestamp. However, some folders timestamp remain at the last syn timestamp when i moved from WinXp to Win7 and i did not manage to correct it.

Tuesday, 11 June 2019

PDFCreator does not print

This utility program is very stable (with many version updated) even on my upgraded Win 7 x86 computer but the last working version on my Win 7 is v2.2.2 released on Feb 2016.

Any following new version does not work on my computer because whenever i launch a print, the pdf file is not generated. The printer print test page function does not generate anything as well.
I cannot find any solution or repair advise therefore I have to revert PDFCreator back to v2.2.2 in order to continue using at least a working copy for myself.

Today while i am upgrading my Windows platform from 7 x86 Intel Duo Core to 10 x64 Intel i5 (different computer hardware), i try to upgrade PDFCreator to the latest version to see if the problem has been solved.

To my surprise the latest v3.5.0 still continue to refuse to generate pdf file. As a result i try to google for a fix and landed on this site https://forums.pdfforge.org/t/pdfcreator-simply-will-not-print-help-needed/12715/7.

The user has reported problem that's the same issue on me. A support staff name Robin seems to point to the root of the problem, the security permissions at the PDFCreator spool folder is not configure correctly. So i check on the spool folder properties, "%USERPROFILE%\AppData\Local\Temp\PDFCreator\Spool", and the full control access right was not enable/allow. Refer to screenshot below.


After that i edit the SYSTEM and Administrators user's permissions to add with full control. Then the PDFCreator v3.5.0 is finally able to generate a pdf file now.


Update 25 Jun 2019

The same thing has happened again. PdfCreator does not generate pdf file. Apply the same Full control permissions to SYSTEM & Administrator in "%USERPROFILE%\AppData\Local\Temp\PDFCreator\Spool" and the problem disappear.

Update 28 Dec 2022

The same thing has happened again on Win10 and PdfCreator 4.2.0. However the Print PDFCreator Test Page is working, unlike the problem on Win 7 and PdfCreator 2.2.2. The same solution apply again which is to add full control permissions to user "Administrator" at the PDFCreator Spool folder. 

Side note 
The Save setting on PdfCreator 4.2.0 was set to Automatic and unique filenames was enable. This setting will not popup the save dialog.


To allow save dialog to show, change the save setting to Interactive in which the setting for ensure unique filenames will be removed also. Finally remember to click Save button to activate the changes.


The setting to activate RSS news feed and send usage statistic is disable also.


Wednesday, 3 April 2019

Windows 7 menu or context menu item will re-appear again shortwhile after clicking

Last update 15/Nov/2019

Long time ago i have noticed that whenever i click a menu in my xbase ++ customized program i always see the same menu item re-appear again in split seconds near the oroginal menu item screen location.

At 1st i thought it was some defect in the xbase ++ compiled program but today the same thing happened with my editor MED CX when i try to paste a string with the context menu.

As a result, i google for more info and have found a youtube with the link below

https://www.youtube.com/watch?v=sIvpiq9Ba0I

It is the 'Fade out menu items after clicking' in the Performance Options->Vusual Effects that has caused the problem.

Below is the step to uncheck the option

1. Right click "My Computer: and click "Properties"
2. Click "Advanced System Settings" 
3. Under "Peformance" click "Settings" you should see that option. 

Uncheck the option and click 'Apply'. Thats it.


P/s: Windows 10 doesn't quite affected by this issue. 

Friday, 3 November 2017

Windows 7 context menu 'New' show only "folder" option

Windows 7 - New context menu has "folder" option only


Couple of months ago when 1 day i do right click on a folder trying to add a new Rtf document but  the option was not there together with other options except Folder on New menu. Hence i thought it was the problem with New menu missing Rtf only.

Later i have found out that this problem has happened also but in different folder. Some folders work but other doesn't.


2 days ago i have found it very inconvenient so i have decided to fix it. 1st i try to check where are those folder that affected but it seems to be in random folders. So i google for more info about "Windows 7  right click new rtf missing" hopefully to can find a fix. One of the top search result show a site about remove and restore default "New" context menu in Windows 7 and Windows 8. 


https://www.sevenforums.com/tutorials/28677-new-context-menu-remove-restore-default-menu-items.html.

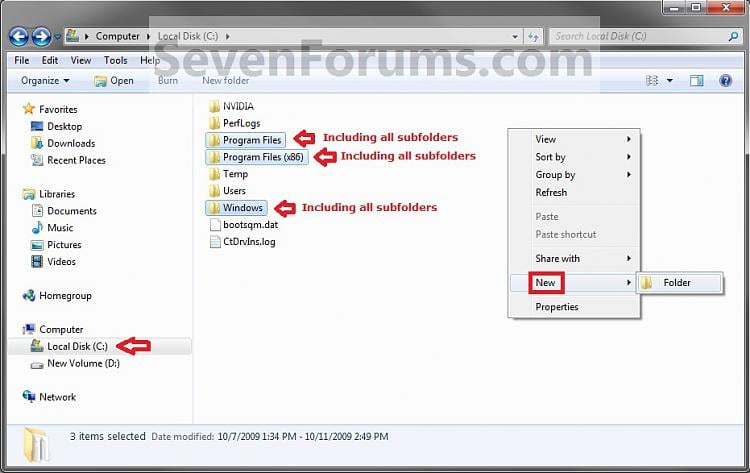
There is a note at the website about only Folder available in the New context menu is in the root directory of the C: drive, C:\Windows folder, C:\Programs Files folder, C:\Program Files (x86) folder, and C:\User folder.

EXAMPLE: "New" Context Menu in Root Directory


NOTE: In the C: drive, C:\Program Files, C:\Program Files (x86), and C:\Windows root directory folders and all of their subfolders, you will only have New - Folder available.

New Context Menu - Remove &amp; Restore Default Menu Items-root_directory_new_context_menu.jpg


But those affected folders at my computer apparently does not belongs to the folders stated above.

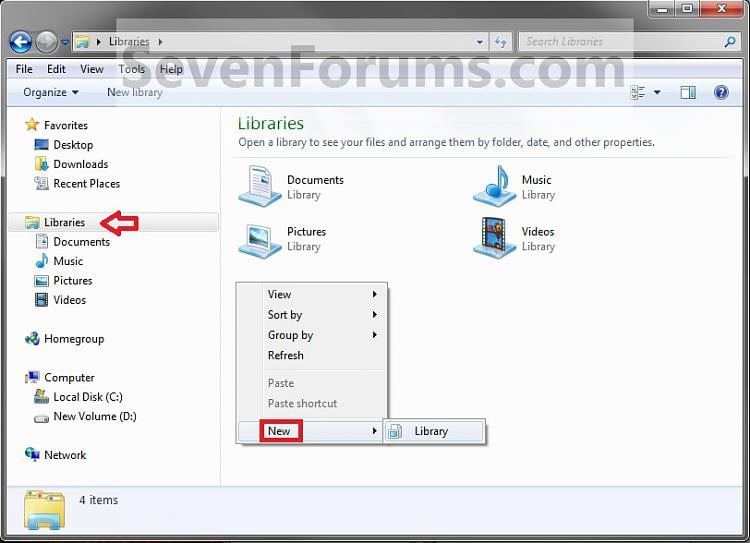
A further note about Libraries folder.

NOTE: In the Libraries folder, you will only have New - Library available. However, in the included folders in a library, you will still have the default New context menu items available.

New Context Menu - Remove &amp; Restore Default Menu Items-libraries_new_context_menu.jpg

Than i check with regedit.exe to see whether the following string value is there
HKEY_LOCAL_MACHINE\SOFTWARE\Classes\.rtf\ShellNew\NullFile to confirm if Rtf document option is in context menu. The key value existed therefore this is not the cause.

So i google more about 'win 7 why some folder has only "New folder" option in the New context menu'. A site Option to create a new text document is missing from the right click menu on the desktop suggested that to use SFC /SCANNOW command to repair corrupted system files. Use the System File Checker tool to repair missing or corrupted system files.

I did that and have discovered from the %WinDir%\Logs\CBS\CBS.log ufat.dll and uexfat.dll is corrupted. The site also suggested to download DllEscort to fix the corrupted dll. Repair Corrupted ufat.dll Files For Windows. After the fix and restarted the computer, the same problem still exist.

Now i was forced to go back again to check where are those folders that have been affected and why? I started to browse through partition by partition instead of folders. To my surprise other than Drive C: with certain specify folders mentioned earlier, only Drive E: (one of my partition in the harddisk) is affected and it stored mostly my documents, and which is why i have problem creating new documents using context menu most of the time.

Since only one partition (Drive E:) is affected, so i decided to check all the drives if they have the same properties especially Drive E:. What i have discovered from all the drive's properties is that they have the same number of users access in security tab.


But Drive E: has extra 2 users, Everyone & CREATOR OWNER, which both does not have any permissions access option to select either Allow or Deny.


And the previous google search also suggest that user's right to access folder will affect New option to create varies new document in context menu.

The next thing is try to remove that two users in Drive E: and see if the problem can be solved. After done that finally context menu in Drive E: is able to show all option for New to create new documents.

This has concluded that the user access permission actually will affect the New option in context menu.

The last note is that how did that two users were added to security access in Drive E:.

Monday, 2 October 2017

eMule V0.50a eD2K

eMule V0.50a eD2K cannot connect to server

I haven't used eMule for more than a year, before it was OK. Last week when i start eMule the eD2K server cannot be connected but Kad works fine, connected.


eD2K not connected

Kad connected
I than Google for eMule servers cannot be connected and found someone suggested to fix serverlist as below.

In 'Servers' right click on a server, choose 'Remove all' click in the space under 'Update server.met from URL' and press Ctrl and Del, used serverslists should desappear, click here and choose 'Add to eMule', use only these servers, otherwise you probably have a faked serverslist.


Here is the servers address list

Than i add the 1st IP to the New Server IP or Address column with Port # and Name of server than click Add to list button but eMule reject the add.


So i look at another help on eMule forum. A member suggest to fix the serverlist also. Here the steps.

Options - Server, be sure options number 4,5 and 7 are checked, remove all other checkmarks.
So options that have to be checked are only: "Use smart LowID check on connect", "Safe Connect" and "Use priority system".
In Servers click on a server and use Ctrl and A to select all servers, choose, if possibile, "Remove From Static List", rightclick on a server and choose "Remove All Servers".
In "Update server.met from URL" paste one of the following (or them all if you like, one at a time):

http://shortypower.org/server.met
http
://gruk.org/server.met.gz
http
://serveurs.emule-french.org
http
://upd.emule-security.org/server.met
http
://peerates.net/servers.php

And hit Update

After pasted the first web address 'shortpower.org/server.met, eMule servers list has been filled. Click Connect to have server connect now.


So paste more web address to add more eMule servers.


Wednesday, 28 June 2017

Change fonts in Lenovo P780

How To Change Fonts On Lenovo Devices


Changing the system font of my the system is one of such blocked features. On my Lenovo Yoga 8 B6000-HV Tablet and P780 phone, I can't change the default font at all thus I've had to rely on third party apps to change the fonts
#HiFont is the only app that seems to work flawlessly on my Lenovo P780 and even after deleting the app, the font change stays put.


Note: This app requires root access. Rooting your Lenovo device is pretty easy using Framaroot v1.9.1 which I've written about in the past. You can find it by using the search bar.

Sunday, 25 June 2017

40tube Dialog

Error using 40tube Dialog in Win7

1. Error message keep poping out regulary.


It looks like file open issue, permission not granted since it is used by another process.

2. Can check new header but cannot update to group.

Try to install new & clean 40tube Dialog. 
(Special note to Win7, Win8 and mostly Win10 for installing 40tube Dialog)

Rename existing folder "40tube dialog" at C:\program files\ to another name. Downloaded file from http://dialog.datalist.org/, (4d2b38.exe) 40tube Dialog  2.0.15.1 Installer.

Installed to "C:\Program Files\40tube Dialog" folder. Download (dialog.84.zip) Dialog.exe 2.0.15.84 to replace Dialog.exe 2.0.15.1 for update. 

To use this update, first install Dialog 2.0.15.1 using one of the installer files above. To update to Dialog 2.0.15.84, download the "dialog.84.zip" file above. Rename the existing "dialog.exe" file in the "\Program Files\40tude Dialog" folder to "dialog.exe.old", and then extract the updated "dialog.exe" to the same folder.

Same error also. Google for answer found some sites like https://www.w7forums.com/threads/40tude-dialog-on-windows-8.17658/ suggested that 

Dialog doesn't work well on Windows 7 unless it is installed into a non-Program Files directory, i.e., it has to be installed in a directory which is not one of the two Windows 7 standard program file directories. Maybe the same problem in Windows 8.

Moved folder "40tube Dialog" to Drive G (3PP APP) and finally it is working now. 

Copy all data in previous 40tube dialog folder to "40tube dialog" folder in Drive G. Further test confirm it worked accordingly

The solution is to move 40tube Dialog folder to a non-Program Files directory for Win7, Win8 or even Win10.


Monday, 27 March 2017

Error printing a PDF file

Error "The Document Could not be printed" & "There were no pages selected to print" when printing a PDF file

Last week i have had problem printing PDF file to Brother MFC-J200 using Acrobat Reader XI V11.0 running on Win 7 32 bits. It will always prompt with the error above.


Printing with other software like Word doesn't has any problem. However printing to PdfCreator (generate a copy of Pdf file from any software) works. So the problem must have been lied on the Acrobat Reader itself.

I don't have any other printer to test with but using Chrome to open the Pdf and print works also.

I guess it may have caused by the last update with Brother full driver to fix the problem on "Control Center 4 unable to connect to Brother MFC-J200 Scanner" or other fix.

Googling on that error has some suggestion like uninstall and reinstall Acrobat Reader again but that doesn't help (Now i am using latest Adobe Reader DC 2015.023.20070). Some suggest to Print as Image but that doesn't work either.
1. Open the PDF file in Acrobat.
2. Choose File > Print.
3. Click Advanced at the bottom of the Print dialog box.
4. In the resulting Advanced Print Setup dialog box, select Print As Image and click OK.

Other suggest to check make sure printer drivers are up to date that it is a common problem with new software and printers not being compatible and indeed the driver is the latest version.

Some also suggest to delete the Acrobat preferences folder

1. Close Acrobat
2. Choose Start > Run and Type %APPDATA%Adobe\Acrobat\ in the Open Text box. Click OK.
3. Right-click either the 6.0 or 7.0 folder and choose Delete.
4. Start Acrobat and print.
Note: Acrobat preference files contain application settings such as toolbar arrangements. Once Acrobat is restarted, new preferences will be created automatically based on application defaults. Deleting preference files will not result in the loss of saved documents.
Still it doesn't work.

Other suggested to disable setting at the Preferences.
1. Open Adobe Reader > Edit > Preferences
2. Under Documents > change 'View documents in PDF/A mode' to Never.

3. Under Security (Enhamced), disable Protected Mode at startup

And this doesn't help also.

But there is a site suggested to disable additional setting at Preferences
1. Turn off one or more of the following settings:
    - Enable Protected Mode at startup
    - Protected View
    - Enable Enhanced Security


By going so to disable the Enhanced Security, finally the error message disappear when printing a PDF file in Acrobat Reader.

Thursday, 16 March 2017

How to Delete Photos from Whatsapp

How to Delete Photos from Whatsapp Group, Erase Media, 

Images, Videos, Pictures on Android, iPhone


Lately my Samsung Galaxy S7 (32GB internal Ram + 32GB SDRam) has kept complaining about insufficient memory space.

When I checked where my 32 GB utilized, I found major share in Whatsapp media. I immediately tried to find how come Whatsapp has used more than 10 GB? And found, there are few Whatsapp group where I have more than 4000 medias!! 😀

First question came in my mind was, How I can Delete Photos from Whatsapp group which is taking huge space of my Phone’s memory? I thought for a while and found 2 options as per below, which will help you to delete all images or media from your Whatsapp group if you are using iPhone and Android based mobile. This may also help you to understand how you can apply similar solution for your Java, Windows, Nokia or Blackberry too.

Option 1: Delete Photos From Whatsapp Group at Once

Yes, you can do this!! Let me teach you how?
Best way is, you can click “Clear Conversation” from group options which will clear full conversation, but still you may follow lengthy way as described below if you wants 🙁
  1. Contact Whatsapp Group Admin that you are leaving group as you would like to erase all group medias which is taking huge space on your iPhone or Android mobile phone. So request him to Add you back immediately after you leave the group
  2. Before leaving the group, send Whatsapp conversation in email. which will send you all medias in your email for backup purpose
  3. Leave/Delete and Exit whatsapp group
That’s it. All the photos, images, videos was saved on your phone because of this group is deleted and you will have free space.
Even though, this method is fastest and best to Delete photos from whatsapp; there are few problems like below
  • If admin of the group will not add you back :p
  • If you are the Admin of the group, you may lose your role 🙂
  • In case, you would like few of the medias out of all.
If you think above points is important and you don’t want to take a chance by deleting all photos from whatsapp group at once, you may use 2nd method as described below.

Option 2: Delete Photos from Whatsapp Group one by one

Well, I know this method is boring specially when you have hundreds or thousands of media pictures and videos stored by your whatsapp group. But if option 1 is not suitable, you have only this option.
Well, even with this option, you may go inside “All media” section of the group and select all photos/videos you would like to delete and click “Delete” icon to delete all of them. But still you need to spend time behind selecting those thousands medias. 🙁
Anyways, I hope these 2 options will be useful for you and will surely help you to know How to Delete Photos from Whatsapp group and remove medias, pictures, images, videos from Whatsapp group to release free space for your mobile’s internal memory.


1

Open WhatsApp. You can remove all photos and videos saved from a single chat in WhatsApp. This will remove all media from that chat without deleting its text messages.[2]


2

Tap the “Chats” tab.


3


Tap a chat from which you want to remove all media.


4


Tap the ⁝ icon.


5


Select “Media.”


6


Tap and hold a thumbnail. This will select the photo or video for deleting. You’ll know its selected when you see a checkmark over the image.


7


Tap (without holding) more photos you want to delete.


8


Tap the Trash icon. It’s at the top right corner of the screen.


9


Make sure there is a checkmark next to “Delete media from phone.”


10


Tap “Delete.” The selected media is now removed from your device.

How to Delete a Desktop icon with no properties

  In October 2024, I enabled Windows Subsystem for Linux (WSL) and installed Ubuntu on my Windows 10 system for an AI test project from Yout...