Sunday, 11 October 2020

New printer disappear in “Devices and Printers” after installed to Windows 10

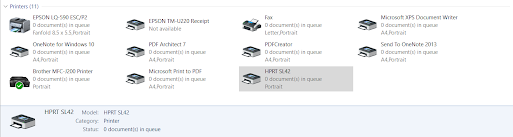
I have just installed a new printer HPRT SL42 to Windows 10 but it cannot be seen in “Devices and Printer”.😨 The actual printer is not installed yet, only the driver is installed for software programming test.

However, i can still select them in the Printer list in Word, Acrobat, etc. Somehow the printer can be used but cannot be seen. This doesn't help because sometime i need to change certain properties in the printer like paper size and etc right from the "Devices and Printers".

I tried removing the printer by Revo Uninstaller Pro to get rid of all leftover in registry, restart Windows and re-installing the printer again. Still the printer cannot be seen.

Then I open the Device Manager in Control Panel and HPRT SL42 is in the Print queues.


If i right click HPRT SL42 and select Properties, i can see that the Location for this printer is on Brother MFC-J200 Printer. This make me wonder that the printer link has been merged with Brother MFC-J200. To prove that i open the "Devices and Printer", right click on Brother printer and sure enough HPRT SL42 is in the option for Printer properties as well as some other option.


Now the question is how did this HPRT SL42 printer installed together with the Brother MFC-J200 printer? There must be some common hardware that shared by this 2 printer.

As i can recall when installing HPRT SL42 printer i have selected USB001 as the connection port and Brother MFC-J200 use the same port too. Then i open the Printer properties for HPRT SL41 and i saw USB001 was used by both printer.


To test if HPRT can be separated from Brother if i change the port, i tick the LPT2 as the new port now (I can't select another USB port since the physical printer is not connected yet and new USB port will not be added).

After i click the Apply and OK button, the HPRT SL42 finally appear in the "Devices and Printers".


Monday, 13 July 2020

WinMerge - Location Pane view doesn't open anymore

In WinMerge v2.16.2.0, when the Location Pane view on the left was closed by accident then it will not be able to automatically reopen itself anymore after any subsequent files were opened for comparison.


It seems WinMerge is not saving the Location Pane settings.

The work around is to edit the registry setting for WinMerge.

HKEY_CURRENT_USER\Software\Thingamahoochie\WinMerge\Settings-Bar0\Visible = 1

Set Bar0 Visible to 1. May have to close and reopen the Registry Editor to save the new setting.

The same might happen to Diff Pane. Use the registry setting below.

HKEY_CURRENT_USER\Software\Thingamahoochie\WinMerge\Settings-Bar1\Visible = 1 (Using "Settings-Bar1" instead of "Settings-Bar0").


Monday, 2 March 2020

How to Multi-Boot Two or More Versions of Windows

Most computers have a single operating system installed on them, but you can multi-boot from many operating systems on the same PC. You can have two (or more) versions of Windows installed side-by-side and choose between them at boot time.

The Basics

The process for creating a dual-boot system is similar no matter what operating system you’re dual-booting with. Here’s what you’ll need to do:
  • Install the First Version of Windows: If you already have a single Windows system installed on your computer, that’s fine. If not, install Windows normally. You may want to use custom partitioning settings and leave free space available on your hard drive for the second version of Windows.
  • Make Room For the Second Version of Windows: You’ll need available hard drive space for the next version of Windows. If you have Windows installed, you can resize the partition. You could also insert a second hard drive into your computer (if it’s a desktop computer) and install the second version of Windows to that hard drive.
  • Install the Second Version of Windows: Next, you’ll install the second version of Windows. Ensure you choose the “Custom Install” option, not the “Upgrade” option. Install it alongside the previous version of Windows, in a different partition on the same disk or on a different physical disk.
You’ll then be able to choose which copy of Windows you want to boot at boot time, and you can access the files from each version of Windows on the other one.

Install the First Version of Windows, If It’s Not Already Installed

Install the first version of Windows on your PC, assuming it’s not already installed. If your computer already has Windows installed on it, that’s fine. If you’re installing Windows fresh, you’ll want to choose the “Custom install” option when going through the installation wizard and create a smaller partition for Windows. Leave enough space for the other version of Windows. This means you won’t have to resize partitions later.

Shrink Your Windows Partition

You’ll now need to shrink your existing Windows partition to make room for the second copy of Windows. If you already have enough free space or you’re installing the second copy of Windows to a different hard disk entirely and it has available space, you can skip this.
Basically, this involves booting the existing Windows system on your computer and opening the Disk Management tool. (Do this by pressing Windows Key + R, typing diskmgmt.msc into the Run dialog, and pressing Enter.) Right-click the Windows partition and select the “Shrink Volume” option. Shrink it to make enough space for the other Windows system.

Install the Second Version of Windows

Next, insert the installation media for the second version of Windows you want to install and reboot your computer. Boot it and go through the installer normally. When you see the “Upgrade” or “Custom install” option, be sure to select “Custom” — if you select Upgrade, the second version of Windows will install over top of your first version of Windows.
Select the “unallocated space” and create a new partition on it. Tell Windows to install itself to this new partition.  Just be sure not to select the partition containing the version of Windows currently installed on your system, as two versions of Windows can’t be installed on the same partition.
Windows will install normally, but it’ll install alongside the current version of Windows on your PC. Each version of Windows will be on a separate partition.

Choosing Your OS and Modifying Boot Settings

When the installation is finished, you’ll see a boot menu every time you boot your computer. Use this menu to select the version of Windows you want to boot.
Depending on which versions of Windows you’re using, the screen will look different. On Windows 8 and newer versions of Windows, it’s a blue screen with tiles with the title “Choose an operating system.” On Windows 7, it’s a black screen with a list of operating systems and the title “Windows Boot Manager.”
Either way, you can customize the boot menu’s settings from within Windows itself. Open the Control Panel, click the System and Security option, click the System icon, and click Advanced System Settings at the left side of the window. Select the Advanced tab and click the Settings button under Startup & Recovery. You can choose the default operating system that boots automatically and select how long you have until it boots.

If you want more operating systems installed, just install the additional operating systems on their own separate partitions.

Sunday, 24 November 2019

Html help workshop does not show images after compiled

I use Word to create the HTML files. Any images dragged and inserted into the help pages will be stored in a sub folder of the same name with the help file.

The reference to the images in the HTML source include the correct sub-folder name and file name (nothing seems to be wrong there).

If the image source is PNG format, another same image name with GIF format will be created.

Now i compile the project into a .chm file and i cannot see any images. Also, the HTML Help Workshop compiler statistics show the correct number of images processed.

Word could have adds some HTML help-incompatible markup to the HTML files that save as Web Page facility. A simple fix to this is to save the file as type Web Page, Filtered (*.htm,*.html).


Thursday, 14 November 2019

HTML Help Workshop - Add more tabs & buttons

The HTML Help Workshop will compile chm help file by default only with Contents and Index tab and Hide, Back, Print and options buttons.

To add Search tab, click the side bat button 'Change project options' , click Compiler on top bar and then enable 'Compile full-text search information'.


To add Favourites tab, click the side bar button 'Add/Modify window defination'. In general tab, enter a Window type description and click 'Add'. Take note once the Window type has been added, it cannot be removed. Make sure to use a proper name.


Then click Navigation tab and enable Favourites tab.


To add the buttons, click the Buttons tab and enable Forward, Refresh, and Locate button.


File association in Windows 10

Windows can only open one program for a particular file type, file extension, automatically. 

So if you like to work with your PNG files in Photoshop Elements, for example, and not Paint, changing the default file association for PNG files is required.

Usually if you double click on a file in the folder and the application will be started if it is not open yet or will be opend by that application.

However, sometimes the double click doesn't work even though the file can be opened by the application itself.

Today while I was checking for a file type belongs to another application in the registry using Regedit.exe, I accidently found the problem why that file type, .prg, cannot be opened by the associated application when double click.

In was a glitch in the registry that the file type 'prg_auto_file' was associated to 3 unreadable registry keys. Remove those 3 unreadable and restart Windows resolve the issue.

16/May/2020 Update

Same thing has happened today again. The prg file associated with Med cannot be opened by double click or drag to Med file area.

Run RegEdit to check .prg_auto_file and those unreadable registry keys are not there. 


Delete these 2 keys in the classes root

1. Computer\HKEY_CLASSES_ROOT\.prg
2. Computer\HKEY_CLASSES_ROOT\.prg_auto_file

Restart the computer. The data value of ProgId in the UserChoice

Computer\HKEY_CURRENT_USER\Software\Microsoft\Windows\CurrentVersion\Explorer\FileExts\.prg\UserChoice will change automatically from

'.prg_auto_file' -> 'Applications\\medcx.exe' and this will solve the problem.


How to boot VMware Workstation Virtual Machine from USB Drive

Software : Windows 10 Pro & VMware Workstaion 15

Hardware : Intel i5-6400 2.70Ghz, 16GB, ASUS B150 PRO GAMING D3

VMware does not support boot from USB drive. The solution is to add an additional hard disk drive and point the USB drive as a phisical disc to the newly added drive. Then change the BIOS boot options to bootfrom the newly added hard drivce.

First step is to check the USB Drive #. Plug in the Win 10 bootable USB drive. In this computer it is Drive K.


Then open command prompt by run as administrator. Type 'diskpart' and then 'list disk'. 


Here the USB drive is 'Drive 2' 28 GB. Take note on that.

Next add the USB to VMware. Open VMware, cick on the 'Edit virtual machine settings' for the hosted OS. Click 'Add' on hardware. Make sure default Hard Disk is selected and click 'Next'.

In the next Disk Type click Next to stay as SCSI. Enable Use a physical disk and click Next. Then next choose PhysicalDrive2 (USB Drive #) and Use entire disk for Usage. In the last window click Finish to complete the adding of USB Drive.


Finally, Click VM on the hosted OS and choose Power On to Firmware in the Power menu to boot into computer BIOS.

When the firmware window appear, use arrow key to choose EFI VMware Virtual SCSI Hard Drive (1.0) to boot from


The final screen booting into Windows setup from USB Drive.


VMware Workstation unable to start

Software : VMware Workstation 15, Windows 10 Pro and host OS Windows 10 Pro, Windows 7 Ultimate and Windows XP SP3.

Hardware : Intel i5-6400 2.70Ghz, 16GB, ASUS B150 PRO GAMING D3
When the host Win 7 or Win XP is power on, an error message pop up saying

'This host supports Intel VT-x, but Intel VT-x is disabled'

A further google search in https://www.howtogeek.com/213795/how-to-enable-intel-vt-x-in-your-computers-bios-or-uefi-firmware/ show that modern CPUs include hardware virtualization features that help accelerate virtual machines created in VirtualBox, VMware, Hyber-V and other apps. But this features aren't always enable by default especially on Intel CPUs.

For this case the VMware hardware acceleration features Intel VT-x built into the Intel CPUs needs to be enable in the ASUS BIOS.

Finally turning VT-x on in the BIOS manage to start the hosted OS.


Tuesday, 12 November 2019

HTML Help Workshop Error

HTML Help Workshop and Windows 10

1.  Compiled error HHC6003

When run the HTML Help compiler gave an error code HHC6003.

From Google search the error code was referencing to file itcc.dll was not registered. To register the file,  open the command prompt in administrator mode. Type the command below in the Dos prompt.

regsvr32 C:\Windows\System32\itcc.dll


2.  Error saving project file .hhp

When trying to save a project, the following error message:

Cannot write to the file ""myfilename.hhp"".

This has something to do with the quotes. It is also the same problem when trying to compile the project with the 'Save all files before compiling' button enabled. The HTML Help put quotes around the file name as a result it became double quotation marks.

This is a registry glitch that cause the project path to be displayed in quotation marks in the compilation dialog box. To fix the problem in the registry, use regedit and find those hhp shell open command and delete the quotation marks in the project path.

Before "C:\Program Files\HTML Help Workshop\hhw.exe" "%1"


change to

After "C:\Program Files\HTML Help Workshop\hhw.exe" %1

Close and restart HTML Help Workshop again. This should do the trick.

Sunday, 3 November 2019

Wifi disconnects when charger cord is plugged in

Recently my son has noticed that his laptop is running slow/lag. Than he reset his Asus laptop A550J i5 12GB Windows 10 (upgraded from Windows 8) using Settings->Recovery->Reset this PC->Get started & choose the option 'Remove everything'.


The Windows 10 was then reset to a fresh start/Clean install and the speed is back to normal. Then he install the online game and was able to access to internet connecting to my home modem router and continue to play the game.

However, after a while, he notice that the wifi will be disconnected when he stop the game for a rest. He has to reconnect wifi again in order to continue to play the game. This has caused some inconvenience. So he ask for my help.

At first i check the wifi signal strength by moving the laptop to different location around the router to verify whether its a signal weak effect. But the wifi did not disconnect. Than i upgrade the router wifi protected access from WEP to WPA2 just maybe Windows 10 latest version may need more security encryption. However it does not help either.

Next i disable all the softwares that auto start with Windows. That has not disconnect the wifi either. While all possible computer related fix has been tried,  i start looking at hardware interference. So i remove all electronic items and components further away from the laptop. Started with the power bank, mobile phone, headphone, earphone, lamp, cooling fan till the laptop power adapter.

Than i realise when the power cord has plugged in for charging, the wifi will get disconnected as long as there is no software requesting for online service. For ezample, during when my son is playing online game (constantly request data from game server), the wifi did not disconnect. Only when he stop playing than the wifi will get disconencted.

More test have also confirmed that the wifi will be disconnected no matter which hotspot the laptop is connected to, the router or mobile handphone.

Now we know the actual cause. So i ask my son to try to use USB tethering connection from the mobile phone to see if has the same problem. But the next day my son has informed me that he has solved the problem by using the Network reset in Network status. Right click on Network Internet access in taskbar, click Open Network & Internet settings.


This network reset has solved the problem in my son laptop wifi get disconnected when power cord is plugged in.

From this experience there are 2 things that have been learn in Windows 10 which is itself and the network can be reset. Similar to re-installation for Windows 7 and remove and re-install the network driver.

How to Delete a Desktop icon with no properties

  In October 2024, I enabled Windows Subsystem for Linux (WSL) and installed Ubuntu on my Windows 10 system for an AI test project from Yout...