Sunday, 25 October 2020

I can't download from google drive

Today I was trying to download some files from a google shared drive in Chrome. There are folders and files in the drive. When I right click on the folder or the file i can use the context menu to do the download.

A message prompt will show preparing for the download.


Upon finishing Windows will open a local folder (previous saved folder) to save the download.

However, after the download preparation has been completed the save folder is never open. Thus none of those folders and files are able to be download.

This has happened couple of times before. Some download was omitted but other was managed to download. I cannot remember what i did to get those download successful. Nevertheless this time i will check why those download has failed.

Some suggestion from google search that maybe too many google account were signed in at one time (X-notifier extension installed for checking multiple email accounts). I log out from all the google account except one but still the download fail.

It looks like the download was blocked. I disable the ads-killer extension and its still the same. Another google search suggested that the cookie was blocked. And i saw in the Chrome setting that the Block third-party cookies was selected. 

Then i select the Allow all cookies and finally the download was successfuly.

But i still need to block third party cookies. I cannot set to allow all cookies then after the download reset to block third party cookies again which is so troublesome.

Than i thought maybe the cookie was blocked in that google drive. Sure enough there was an icon in the right side of the address bar that when the mouse hover over a text message will show 'Third-party cookie blocking'. 


When i click on the icon a Windows prompt show that the cookies has been blocked.

To unblock the cookies click on the 'Site not working?'. Another Windows prompt will show together with the option to allow cookies


When the option is selected the cookies will be allow for that google drive. 


That is all.


Wednesday, 21 October 2020

How to Move Off-Screen Window back On-Screen

 Today i switch on the Windows 7 PC which was setup for 2 monitor display before but now only use a single monitor.

When i start a program where it has displayed in the second monitor before now has became off-screen Window. I can't use the mouse to drag it back to the main monitor. 

From the Microsoft Bing search i have found some sites that do the trick, howto geek and tenforums

I use the simple trick as follow.

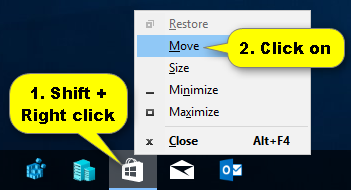
1 Press and hold the Shift key, right click or press and hold on the taskbar icon of the opened off-screen window (ex: "Store" app), and release the Shift key.

2 Click/tap on Move. (see screenshot below)

If Move is grayed out, then it means that this window is either minimized or maximized. Click/tap on Restore, and repeat steps 1 and 2.
Move Off-Screen Window back On-Screen in Windows 10-restore_window.png

Move Off-Screen Window back On-Screen in Windows 10-move_window.png
3 Your pointer will now turn into the Move Move Off-Screen Window back On-Screen in Windows 10-move_icon.png pointer. Perform either action below to move the off-screen window back on-screen where you want.

Press any arrow key, use your mouse or touchpad to move the off-screen window to where you want, and click/tap on the left button (primary) on the mouse or touchpad to drop the window.

That's it.


Sunday, 11 October 2020

New printer disappear in “Devices and Printers” after installed to Windows 10

I have just installed a new printer HPRT SL42 to Windows 10 but it cannot be seen in “Devices and Printer”.😨 The actual printer is not installed yet, only the driver is installed for software programming test.

However, i can still select them in the Printer list in Word, Acrobat, etc. Somehow the printer can be used but cannot be seen. This doesn't help because sometime i need to change certain properties in the printer like paper size and etc right from the "Devices and Printers".

I tried removing the printer by Revo Uninstaller Pro to get rid of all leftover in registry, restart Windows and re-installing the printer again. Still the printer cannot be seen.

Then I open the Device Manager in Control Panel and HPRT SL42 is in the Print queues.


If i right click HPRT SL42 and select Properties, i can see that the Location for this printer is on Brother MFC-J200 Printer. This make me wonder that the printer link has been merged with Brother MFC-J200. To prove that i open the "Devices and Printer", right click on Brother printer and sure enough HPRT SL42 is in the option for Printer properties as well as some other option.


Now the question is how did this HPRT SL42 printer installed together with the Brother MFC-J200 printer? There must be some common hardware that shared by this 2 printer.

As i can recall when installing HPRT SL42 printer i have selected USB001 as the connection port and Brother MFC-J200 use the same port too. Then i open the Printer properties for HPRT SL41 and i saw USB001 was used by both printer.


To test if HPRT can be separated from Brother if i change the port, i tick the LPT2 as the new port now (I can't select another USB port since the physical printer is not connected yet and new USB port will not be added).

After i click the Apply and OK button, the HPRT SL42 finally appear in the "Devices and Printers".


Monday, 13 July 2020

WinMerge - Location Pane view doesn't open anymore

In WinMerge v2.16.2.0, when the Location Pane view on the left was closed by accident then it will not be able to automatically reopen itself anymore after any subsequent files were opened for comparison.


It seems WinMerge is not saving the Location Pane settings.

The work around is to edit the registry setting for WinMerge.

HKEY_CURRENT_USER\Software\Thingamahoochie\WinMerge\Settings-Bar0\Visible = 1

Set Bar0 Visible to 1. May have to close and reopen the Registry Editor to save the new setting.

The same might happen to Diff Pane. Use the registry setting below.

HKEY_CURRENT_USER\Software\Thingamahoochie\WinMerge\Settings-Bar1\Visible = 1 (Using "Settings-Bar1" instead of "Settings-Bar0").


Monday, 2 March 2020

How to Multi-Boot Two or More Versions of Windows

Most computers have a single operating system installed on them, but you can multi-boot from many operating systems on the same PC. You can have two (or more) versions of Windows installed side-by-side and choose between them at boot time.

The Basics

The process for creating a dual-boot system is similar no matter what operating system you’re dual-booting with. Here’s what you’ll need to do:
  • Install the First Version of Windows: If you already have a single Windows system installed on your computer, that’s fine. If not, install Windows normally. You may want to use custom partitioning settings and leave free space available on your hard drive for the second version of Windows.
  • Make Room For the Second Version of Windows: You’ll need available hard drive space for the next version of Windows. If you have Windows installed, you can resize the partition. You could also insert a second hard drive into your computer (if it’s a desktop computer) and install the second version of Windows to that hard drive.
  • Install the Second Version of Windows: Next, you’ll install the second version of Windows. Ensure you choose the “Custom Install” option, not the “Upgrade” option. Install it alongside the previous version of Windows, in a different partition on the same disk or on a different physical disk.
You’ll then be able to choose which copy of Windows you want to boot at boot time, and you can access the files from each version of Windows on the other one.

Install the First Version of Windows, If It’s Not Already Installed

Install the first version of Windows on your PC, assuming it’s not already installed. If your computer already has Windows installed on it, that’s fine. If you’re installing Windows fresh, you’ll want to choose the “Custom install” option when going through the installation wizard and create a smaller partition for Windows. Leave enough space for the other version of Windows. This means you won’t have to resize partitions later.

Shrink Your Windows Partition

You’ll now need to shrink your existing Windows partition to make room for the second copy of Windows. If you already have enough free space or you’re installing the second copy of Windows to a different hard disk entirely and it has available space, you can skip this.
Basically, this involves booting the existing Windows system on your computer and opening the Disk Management tool. (Do this by pressing Windows Key + R, typing diskmgmt.msc into the Run dialog, and pressing Enter.) Right-click the Windows partition and select the “Shrink Volume” option. Shrink it to make enough space for the other Windows system.

Install the Second Version of Windows

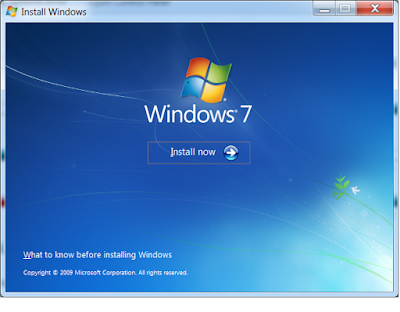
Next, insert the installation media for the second version of Windows you want to install and reboot your computer. Boot it and go through the installer normally. When you see the “Upgrade” or “Custom install” option, be sure to select “Custom” — if you select Upgrade, the second version of Windows will install over top of your first version of Windows.
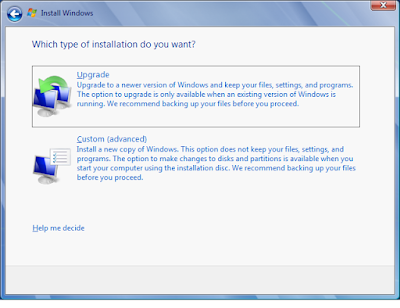
Select the “unallocated space” and create a new partition on it. Tell Windows to install itself to this new partition.  Just be sure not to select the partition containing the version of Windows currently installed on your system, as two versions of Windows can’t be installed on the same partition.
Windows will install normally, but it’ll install alongside the current version of Windows on your PC. Each version of Windows will be on a separate partition.

Choosing Your OS and Modifying Boot Settings

When the installation is finished, you’ll see a boot menu every time you boot your computer. Use this menu to select the version of Windows you want to boot.
Depending on which versions of Windows you’re using, the screen will look different. On Windows 8 and newer versions of Windows, it’s a blue screen with tiles with the title “Choose an operating system.” On Windows 7, it’s a black screen with a list of operating systems and the title “Windows Boot Manager.”
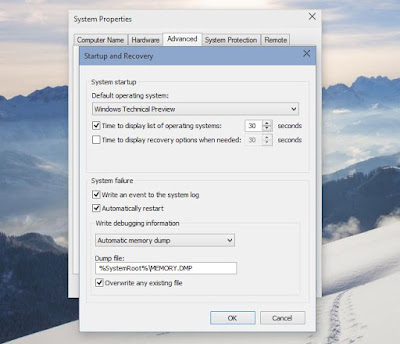
Either way, you can customize the boot menu’s settings from within Windows itself. Open the Control Panel, click the System and Security option, click the System icon, and click Advanced System Settings at the left side of the window. Select the Advanced tab and click the Settings button under Startup & Recovery. You can choose the default operating system that boots automatically and select how long you have until it boots.
If you want more operating systems installed, just install the additional operating systems on their own separate partitions.

Windows 10 – Right-Click Context Menu option is missing and Freeze/Hang

Recently, my Windows 10 has started freezing whenever open a file explorer and right-click on a PDF or image file. The context menu appears,...