Monday, 21 November 2016

Digi phishing email

Email received from Digi

I have received a email from Digi on 17 Nov 2016 claiming that one of my account has an overdue amount and needs to be paid otherwise it will be terminated. And the mobile service has been suspended.

I then check with my payment history and realized that the account number matched and has been fully paid and terminated.

So i suspect this is a phishing email but i can't see any button which can be clicked to download a document to infect the system. Further more this email was sent by the official Digi email address as it can be seen here.


As a result, i sent a reply to them asking for further advise but instead i get a reply saying that my email cannot be delivered because their mailbox is full. However, i can see the download click now which can infect my computer if click.


Now i can confirm it is a phishing email but the question is how did they obtain my account & correspondence from Digi database?

Maybe Digi has some knowledge about it....

Change user folder location like Documents, Downloads, Desktop, etc in Windows 7

How to move them to new locations. This guide applies to all modern versions of Windows: Windows 7, Windows 8.1 and Windows 10.


Your User Folders in Windows

All modern editions of Windows create a collection of user folders for each user account, under “C:\Users\User name”. The collection includes but is not limited to:
  • Contacts - if you are using Windows Contacts, this is the folder where all the data about your contacts are stored. Each contact has its own file, with the extension ".contact".
  • Desktop - this is your Desktop, containing the shortcuts, files and folders you have added to it.
  • Downloads - this is the default folder where files are downloaded from the Internet, if you did not set another location in your default Internet browser.
  • Favorites - the folder where all Internet Explorer favorites are stored.
  • Links - this folder stores the shortcuts you can see in the Favorites section of Windows Explorer from Windows 7 and File Explorer from Windows 8.1. This folder is no longer used by Windows 10, even though it’s still found on the disk.
  • Documents - this is the previously called My Documents folder from Windows XP - the location where your documents are stored by default.
  • Pictures - the equivalent of My Pictures from Windows XP - the folder where all pictures are stored by default.
  • Music - the equivalent of My Music from Windows XP - the folder where all music is stored by default.
  • Videos -  the equivalent of My Videos from Windows XP - the folder where all videos are stored by default.
  • OneDrive - if you are using the OneDrive cloud storage service from Microsoft, this is where your OneDrive files are stored.
  • Saved Games - the folder where all games that are integrated with Windows save your gaming data, so that you can resume playing from your last saved game. However, most games do not use this folder to store saves, even though they should.
  • Saved Searches or Searches - this is where Windows stores all the searches you save for later use.

Here’s how to find the User Folders in your version of Windows

The best way to find the complete list of user folders, in any modern version of Windows, is this:
  • Open Windows Explorer in Windows 7 or File Explorer in Windows 8.1 and Windows 10.
  • Navigate to the drive where you installed Windows: it’s usually the “C:” drive.
  • Open the Users folder and then your user account’s folder, by double clicking or double tapping on them. To give you an example, my user account is named Ciprian and Windows is installed on the “C:” drive. Therefore I have browsed to “C:\Users\Ciprian”.
One improvement in newer versions of Windows is that they offer easy access to some of the most common user folders. For example, in Windows 10, if you open File Explorer, go to This PC. There you will find the shortcuts to the following user folders: Desktop, Documents, Downloads, Music, Pictures and Videos. As you can see, they are not all your user folders, just the ones that you are more likely to use on a regular basis.
Windows, user folders, downloads, documents, pictures, videos, change, location

The same is true in Windows 8.1: open File Explorer and go to This PC. Under Folders, you will find the same shortcuts to user folders, as in Windows 10.
Windows, user folders, downloads, documents, pictures, videos, change, location

Unfortunately, Windows 7 doesn’t offer similar shortcuts in Windows Explorer. There, you have to go to the “C:\Users\User name” folder directly, where “User name” is the name of your user account.
Windows, user folders, downloads, documents, pictures, videos, change, location


How to change the location of Documents, Downloads, Music and other User Folders

Changing the location of all these users folders is possible and can be done using the same procedure. To illustrate this procedure, we will use the Downloads folder as an example and show you how to move it to another location, so that your web browser saves the files you download there and not at the location set by Windows.

Open Windows Explorer in Windows 7 or File Explorer in Windows 8.1 and Windows 10, and go to your user’s folder. Right click or press and hold the folder that you want to move to a new location and select Properties.
Windows, user folders, downloads, documents, pictures, videos, change, location

In Windows 8.1 and Windows 10, you can also use the ribbon from File Explorer. Select the folder that you want to move and then go to the Home tab and click or tapProperties.
Windows, user folders, downloads, documents, pictures, videos, change, location

In the Properties window for the selected folder, go to the Location tab. There you can view its current location on your computer. Click or tap Move.
Windows, user folders, downloads, documents, pictures, videos, change, location

A new window named Select a Destination shows up. Browse to the new location where you want the folder to be moved and click or tap Select Folder.
Windows, user folders, downloads, documents, pictures, videos, change, location

The new location is now shown in the Location tab. To apply the change, click or tap OK.
Windows, user folders, downloads, documents, pictures, videos, change, location

You are asked if you want to move all the existing files from the old location to the new one. We recommend that you click or tap Yes, so that everything is moved and you don’t have issues finding old files that are kept in the old location.
Windows, user folders, downloads, documents, pictures, videos, change, location

The files found at the old location are now moved over. Once the process ends, you are done moving the selected user folder to a new location.

Conclusion

When moving the location of a user folder, don’t use a location used by another user folder. Make sure that you move it to a location that is not being used by another user folder.

As you can see, changing the location of user folders such as Downloads, Documents, Pictures, Music, and so on, is easy to do. Our recommendation is to move these folders to partitions not used by Windows so that, in case of a system crash, they have less chance of being affected by possible re-installs of the operating system. Also, if you are using a modern SSD drive, the moving of user folders will help you save your precious gigabytes for apps and games that need a fast drive. Having your downloads and documents stored on a slower drive is not a problem.

Last but not least, in order to restore or move the user folder to another location, make sure to look for the existing (moved) folder location. Than only you can see the the Location tab when you right click the properties of the folder.

Saturday, 5 November 2016

The reason why i have decided to upgrade my current PC to Windows 10.

Last update : 15/Nov/2019

The 2 PC have been swapped for work duty.

I have 2 PC. 1 PC is using Intel Core 2 Duo E7400 @ 2.8GHz , Gigabyte G41M-Combo socket 775, 4GB DDR3, GeForce 210 1GB & Windows 7 Home Premium 32 Bit as my working PC.

Another PC, a new powerful gaming PC suppose to be my backup unit, is using Intel Core i5-6400 @ 2.70GHz, ASUS B150 PRO GAMING D3 socket LGA1151, 16GB DDR3, ASUS Display nVIDIA GeForce GT 740 & Windows 10 Pro 64 Bit.


Friday, 4 November 2016

Upgrade Windows 7 Home Premium 32 Bit to Windows 10

Last update 15/Nov/2019

The upgrade from Win 7 to Win 10 never succeed. End of story.

System Configuration

Platform : Windows 7 Home Premuim 32 Bit version

Motherboard : GigaByte G41M-Combo

Processor : Intel Core 2 Duo E7400 @ 2.80GHz, 2800 Mhz, 2 Core(s)

BIOS : Award Software 25/10//2012

Physical Memory : 4.00GB DDR3 1333Mhz

Dispaly Card : NVIDIA GeForce 210 1GB RAM Version 341.74

Storage : 120GB SSD (Boot Win), 2TB HD, 240GB HD & CDRom

1st time trying to upgrade to Windows 10

While it is still free to upgrade to Windows 10 before & on 29/July/2016, i use Windows 10 Upgrade Assistant to check if my desktop meets Windows 10 spec requirements but unfortunately the display card GeForce 210 (cannot recall driver version) was not compatible as prompted by the upgrade assistant.

Than i download & install the latest GeForce 210 driver version 341.74 and according to the Geforce website the driver should support Windows 10. However, the problem still persist.

A further google search reveal that my desktop wasn't scanned again to find my new driver. Microsoft has reportedly been downloading Windows 10 installation files on to computers running Windows 7 and 8.x, regardless of whether the users plan to upgrade to the new OS or not. The trick was to delete all new updates and temporary files to take the PC back to when i first received the Windows 10 offer to upgrade.

Browse the root of your system drive, and you may find one or two sizable directories -- $Windows.~BT, and $Windows.~WS. These are hidden folders that contain the Windows install files (make sure Windows is set to show hidden files if the folders aren't visible). While you can just delete large folders, the best way to remove them and regain space is by using the built in Disk Cleanup tool.

Click Start and search for Disk Cleanup. Right-click the application that appears, and select Run as administrator. Select the drive you want to clean up -- this should be your system drive -- and click OK.
Click on Clean up system files, and select the drive again. In the list you’ll see Temporary Windows installation files. If this contains a sizable number of files, select it and click OK to remove the contents. This will clean out everything in the $Windows.~BT folder, but not in the $Windows.~WS directory (Disk Cleanup doesn’t target this particular folder at the moment). You can delete it manually though.
As for preventing the files being downloaded again, go to Start > Control Panel > Programs > Uninstall or change a program. Click View installed updates on the left. Use the search box to locate the following updates: KB3035583KB2952664, and KB3021917 (Windows 7) or KB3035583 and KB2976978 (Windows 8). Right-click each one and select Uninstall. When done, go to System and security in the Control Panel, and select Windows Update > Check for updates. Right-click each of the above updates in turn and select Hide update.
After the temporary files and updates have been removed, eventually upgrade assistant does not report any more incompatibility and those setup files are being download.
Toward the end of download, upgrade assistant show another problem with the error code 0xc1900200

Some useful search in google below related to the error code 0xc1900200 at the moment. The solution has yet to be found.
Try to upgrade again after installed the latest GeForce 210 driver version 342.00 to see if it works.

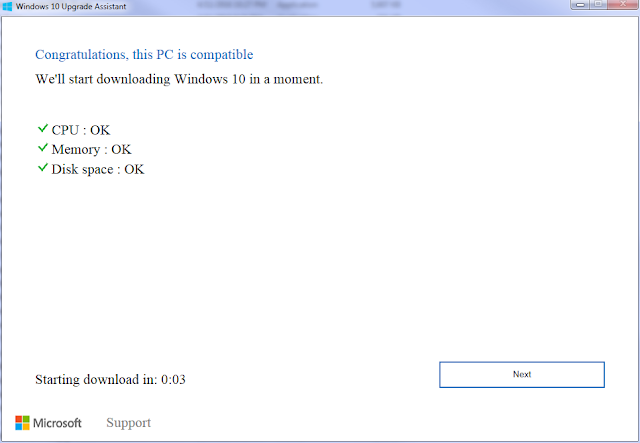
PC is compatible......
Since CPU is Ok, Memory is Ok & Disk space is Ok, i will assume storage is not the cause of the problem. Especially for some feedback googled mentioned about insufficient disk space.


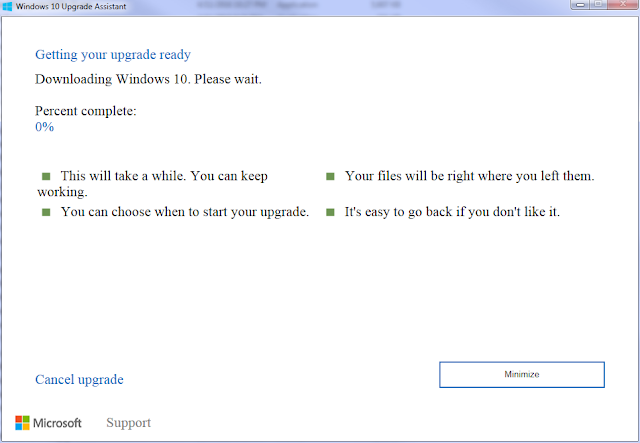
Download Started .....


While waiting for the download, i will create a new post about the reason why i have decided to upgrade my current PC to Windows 10.

http://www.windowscentral.com/windows10-anniversary-update-common-problems-how-fix
Other causes like insufficient harddisk space link

GeForce 210 PCI Express Graphic Card Driver Update

System Configuration

Platform : Windows 7 Home Premuim 32 Bit version

Motherboard : GigaByte G41M-Combo

Processor : Intel Core 2 Duo E7400 @ 2.80GHz, 2800 Mhz, 2 Core(s)

BIOS : Award Software 25/10//2012

Physical Memory : 4.00GB DDR3 1333Mhz

Dispaly Card : NVIDIA GeForce 210 1GB RAM Version 341.74

Storage : 120GB SSD (Boot Win), 2TB HD, 240GB HD & CDRom

Reason why need to upgrade existing GeForce 210 because upgrading from Windows 7 to 10 using Windows10Upgrade tool has reported fail on the display card

GeForce Experience taskbar notification has report new driver version 341.96 is available for download but GeForce Experience taskbar app fail to download it.

Google search for GeForce 210 driver 341.96 to be download from other website. Installed & updated GeForce 210 driver to version 341.96 but GeForce Experience cannot detect new driver available for download while google search has reported with similar link for new driver 342.00.

Go to GeForce website http://www.geforce.com/


Click Driver tab on center top menu


Click Auto Detect Your GPU on bottom green button will fail because it said Java required even though Java has been update to latest version 8 Update 111.

Next is to download latest GeForce Experience from the Automatic Driver updates green button. Once the existing GeForce Experience has been uninstall & install with its latest version, finally it report to have latest driver 342.00 to be download.

Use GeForce Experience to download version 342.00 and finally GeForce 210 driver is updated to version 342.00 and no other new driver is detected.


Note: To be able to login to new GeForce Experience, user name and email must be registered 1st.

Thursday, 3 November 2016

Windows 7 and Word 2010 – Add .rtf (Rich Text Document) to ‘new’ context menu

The usual method to add another file type to the ‘new’ menu in Windows 7 does not work for Rich Text Documents, this is because Rich Text Documents (.rtf) are not “null” files.
To add ‘Rich Text Format’ to the ‘new’ context menu, you will need to create a document template, save it to %SystemRoot%\ShellNew and then add a registry key to the computer.
Note:
After added key to registry, need to wait for about 10 mins or more to see the option for new rtf file type to be added in the context menu

New update for Win 10 Pro 16 Jun 2019

To add rft file type to the context menu, just follow the instruction in the screenshot. Copy the highlight registry add command and paste it to the command prompt to run.


New update for HTM file type 19 Jun 2019

Run Regedit.exe and move to Computer\HKEY_CLASSES_ROOT\.htm. Add a New Key and enter key name 'ShellNew'. Then in ShellNew add a new String Value 'NullFile'. Lastly in NullFile enter Value data '1'.


How to Find Your Lost Windows or Office Product Keys

If the Key Is Stored in Your PC’s Hardware


To obtain Product KEY, use Powershell

Let’s start with the simplest situation. On newer Windows 8 and 10 computers, the key isn’t stored in software where it can be wiped, or on a sticker where it could be smudged off or removed. No one can glance at your computer’s sticker to steal its product key. Instead, the key is stored in the computer’s UEFI firmware or BIOS by the manufacturer.

You don’t have to do anything special if you have this. You should just be able to reinstall the same edition of Windows the PC came with and it should just work without even asking you for a key. (Still, it may be best to find the product key using one of the below methods and write it down before reinstalling Windows–just in case.)

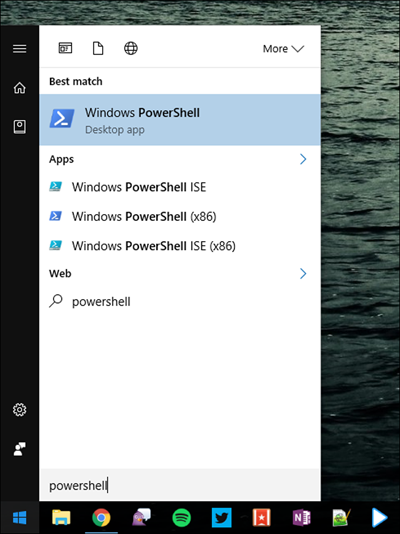
If you want to find the UEFI-embedded key and write it down, you can do so quite simply. Just open the Start menu, type “powershell”, and run the Powershell application that comes up.


Then, enter the following command and press Enter:


You should be rewarded with your embedded license key. Write it down and store it in a safe place.


Use NirSoft’s ProduKey to Recover Product Keys (Even if You Can’t Boot the PC)

The easiest way to get access to your product key is with a third-party utility, and there’s nobody better at those than NirSoft. Their utilities are always crapware-free, and are always really useful. The only issue with this particular utility is that some antivirus will detect it as a false positive, because some malware might try to steal your product key.
Note: the NirSoft keyfinder won’t always work for OEM computers, depending on how they decided to activate the licenses. If your OEM installed your computer and used a single key for all their PCs, this won’t work. It also doesn’t work for Office 2013.
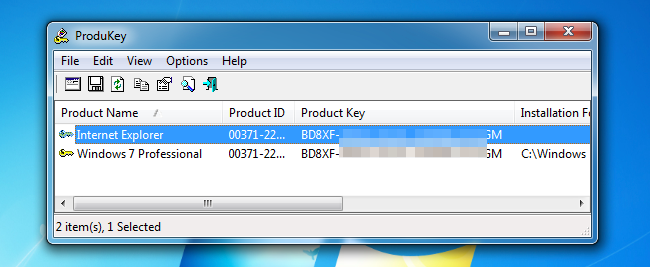
All you have to do is download ProduKey, unzip it, and then run it to immediately see all of your product keys. It’s as simple as that.


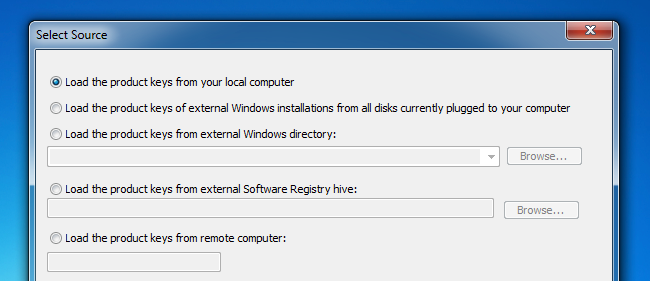
If you want to recover a key from a dead computer, you can hook up the hard drive to a working PC, and then run ProduKey and use File > Select Source to point to the external Windows directory. You can then grab the keys from that computer easily.


Find the Windows Key Without Any Software (Advanced Users Only)


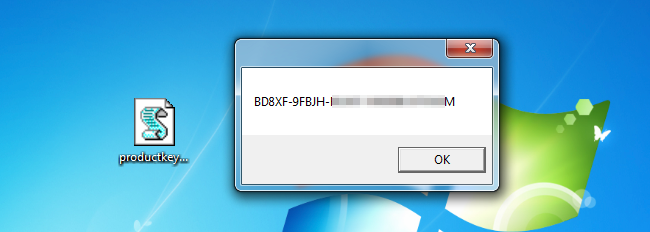
Assuming you can boot your computer without any problems, you can easily create a simple VBscript that will read the value out of the registry and then translate it into the format that you need for reinstalling. We’re not sure where this script came from, but reader raphoenix posted it on our forum a long time ago, so we’re sharing it here for you.
Copy and paste the following into a Notepad window:


You’ll need to use File -> Save As, change the “Save as type” to “All Files” and then name it productkey.vbs or something similar ending with the vbs extension. We’d recommend saving to the desktop for easy access.


Once you’ve saved it, you can just double-click and the popup window will show you your product key.

Pro tip: If you use CTRL+C when the popup window is active, it will copy the contents of the window to the clipboard, and then you can paste it into Notepad or somewhere else.


For more info please follow the link below

Windows 10 – Right-Click Context Menu option is missing and Freeze/Hang

Recently, my Windows 10 has started freezing whenever open a file explorer and right-click on a PDF or image file. The context menu appears,...