1. Install and Run WiFi FTP Server on Your Phone.
2. Find and install the ‘WiFi FTP Server’ app from
Google Play Store on your Andriod phone.
3. Ensure
your Andriod phone is connected to the same WiFi network as your Windows PC.
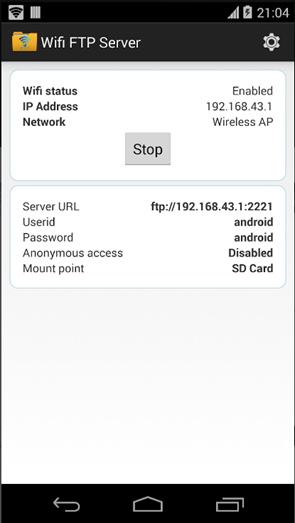
4. Open
the app and click ‘Start’ to initiate the FTP server.
5. Note the server IP address, port (default to ‘2221’), userid (default to ‘andriod’) & password (default to ‘andriod’).
6. To stop server click ‘Stop’.
7. To access the SD card, go to WIFI FTP server setting on your phone, select ‘Root folder’, then choose the Select SD card from the drop-down menu. The FTP server will now display the SD Card folder.


7. Install ‘RaiDrive’ on your Windows PC. Open RaiDrive and click ‘Add’ to add a new drive.
1. 8. Select ‘NAS’ and then choose ‘FTP’. Enter the FTP server IP adreess & port ‘2221’. Enable ‘Anonymous’ to allow access without a userid & password. Click ‘Connect’ and RaiDrive will assign a new drive letter, typically ‘S’. The new drive should now be available.
9. Install ‘FastCopy’ v5.6.0 on your Windows PC. Use FastCopy to copy all data from your phone to a folder on your Windows PC.


