Friday, 4 April 2025

How to Delete a Desktop icon with no properties


In October 2024, I enabled Windows Subsystem for Linux (WSL) and installed Ubuntu on my Windows 10 system for an AI test project from Youtube.

How to enable WSL

1.     Open the Settings App.

2.     Go to Apps > Optional Features.

3.     Enable Windows Sub-System For Linux and restart (do not shut down) your PC.

Installing Ubuntu

1.     Download an Ububtu distribution from the internet

2.     Install it on your system.


Once WSL was enabled, an icon of Tux the penguin appeared on the Windows 10 desktop. This Linux shortcut provide access to \\wsl.localhost. The presence of this icon is a direct result of enabling WSL in Windows.


However, the project did not proceed due to technical problem, lack of familiarity with Linux & addition software, and insufficient time to read the manual.


System Issues Encountered

Over time, I started experiencing frequent blue screen errors and occasional system lag. Initially, I suspected that the issue was due to:

  • A bent processor socket pin, causing memory slot to malfunctiion
  • A newly installed Ram module.

Despite swapping Ram slot and performing Windows system maintenance, the problem persisted.


Realizing the cause

In Feb 2025, I noticed the Linux shortcut on my desktop and suspected that WSL & Ubuntu might be the cause of the system instability. I decided to:

  • Disable WSL.
  • Uninstall Ubuntu.

Since then, the system has been running smoothly, confirming that either WSL or Ubuntu was likely responsible for the blue screens and lag.


Problem: The Linux Shortcut Cannot Be Deleted

After disabling WSL and uninstalling Ubuntu, the Linux shortcut remained on the desktop. Attempts to remove it failed:

  • Right-clicking the icon and selecting Properties displayed the message: "The properties for this item are not available."
  • Dragging the icon to the Recycle Bin did not remove it.
  • No delete option appeared in the right-click menu.


Solution: Removing the Icon via Registry Editor

With the help of ChatGPT, I found that the icon could be removed by deleting its registry entry:

1.     Open Registry Editor:

·        Press Win + R, type regedit, and press Enter.

2.     Navigate to the following location:

HKEY_LOCAL_MACHINE\SOFTWARE\Microsoft\Windows\CurrentVersion\Explorer\Desktop\NameSpace

3.     Look for a folder (key) related to WSL or Linux:

·        The name may appear as a GUID code (e.g., {BLAH-BLAH-GUID}).

4.     Delete the key:

·        Right-click the key and choose Delete.

5.     Restart your PC (Optional):

·        The Linux shortcut disappears immediately after the key is deleted, so a restart may not be necessary.

This method successfully removed the persistent Linux icon from my desktop.


Wednesday, 18 September 2024

Windows 10 – Right-Click Context Menu option is missing and Freeze/Hang

Recently, my Windows 10 has started freezing whenever open a file explorer and right-click on a PDF or image file. The context menu appears, but as soon as i move mouse pointer to “Open with” option to display the dropdown menu of app choices, the file explorer freezes.


I can use the Task Manager to restart File Explorer, but I’m unable to choose any app to open the PDF or image file like the normal context dropdown menu below.


It seems like there’s an issue with the context menu setting. Before using DISM and SFC, I logged into another profile to test the right-click functionality.

The context menu worked properly there. So I’ll need to run DISM and SFC to repair my profile.


Using System File Checker in Windows

Windows 11 Windows 10

System File Checker is a utility in Windows that checks for problems with files on your computer. To run it, follow these steps:

  1. Make sure you've installed the latest updates for Windows, and then restart your machine. To find out more, read Update Windows.
  2. In the search box on the taskbar, type command prompt, and right-click or press and hold Command Prompt (Desktop app) from the list of results. Select Run as administrator, and then selectYes.
  3. Type DISM.exe /Online /Cleanup-image /Restorehealth (note the space before each "/"), and then press Enter. (Note: This step may take a few minutes to start and complete.)
  4. After you see a message that says "The operation completed successfully," type sfc /scannow (note the space between "sfc" and "/") and press Enter.
  5. After you see a message that says, "Verification 100% complete," type exit and press Enter.

https://support.microsoft.com/en-us/windows/using-system-file-checker-in-windows-365e0031-36b1-6031-f804-8fd86e0ef4ca

After running DISM and SFC, I follow the command above and restart Windows 10. My context menu is now working properly again.


Saturday, 13 July 2024

How to Backup Your Andriod Phone to Windows Completely.

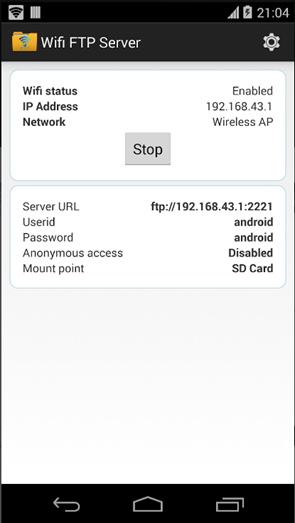
 1. Install and Run WiFi FTP Server on Your Phone.

    2. Find and install the ‘WiFi FTP Server’ app from Google Play Store on your Andriod phone.

    3. Ensure your Andriod phone is connected to the same WiFi network as your Windows PC.

    4. Open the app and click ‘Start’ to initiate the FTP server.

    5. Note the server IP address, port (default to ‘2221’), userid (default to ‘andriod’) & password (default to ‘andriod’).


      6. To stop server click ‘Stop’.

     7. To access the SD card, go to WIFI FTP server setting on your phone, select ‘Root folder’, then choose the Select SD card from the drop-down menu. The FTP server will now display the SD Card folder.


7. Install ‘RaiDrive’ on your Windows PC. Open RaiDrive and click ‘Add’ to add a new drive.

1.     8. Select ‘NAS’ and then choose ‘FTP’. Enter the FTP server IP adreess & port ‘2221’. Enable ‘Anonymous’ to allow access without a userid & password. Click ‘Connect’ and RaiDrive will assign a new drive letter, typically ‘S’. The new drive should now be available.


9. Install ‘FastCopy’ v5.6.0 on your Windows PC. Use FastCopy to copy all data from your phone to a folder on your Windows PC.


Sunday, 19 March 2023

Win 10 associate .rtf file to Word by default and changing back to Wordpad will cause Word to always display a message that it is not the default program

Microsoft Win 10 22H2 and Office professional Plus 2019.

In Windows 10, the .rtf file extension is associated with Microsoft Word by default. 

https://www.zubairalexander.com/blog/how-to-open-rich-text-format-rtf-files-in-wordpad-by-default/

However, if the default .rtf file association changes back to Wordpad,  a message will appear when you open the Word program informing you that it is not the default program.


To prevent this message from appearing, open Word and go to File > Options > General. Scroll down to Startup options and uncheck the "Tell me if Microsoft Word isn't the default program for viewing and editing documents" option.


Tuesday, 27 December 2022

How to edit the right-click context menu for some third-party applications in Windows 10

Right-click on a folder or file in Windows 10 File Explorer will triggers a context menu with an array of Windows applications, including some from third-party applications. When more apps is being installed, this menu will become cluttered with a lengthy list of entries. Many of these are applications that may never be used and it will make the menu more difficult to navigate.

This article will edit the context menu for WinZip, WinRar, DropBox and PDFCreator.

1.    WinZip

https://kb.corel.com/en/129410

WinZip Pro 27.0 when install will automatically install some utilities or applets together. Like WinZip Image Manager, WinZip PDF Express and WinZip SafeShare. To disable those applets in the existing installation one can use the registry editor. 

Start Registry Editor, "RegEdit.exe", in Windows. In the left pane, browse to and click on HKEY_LOCAL_MACHINE\SOFTWARE\Nico Mak Computing\WinZip\Policies.


Locate the policies that you want to disable from the list below: 

  • DISABLEIMGUTIL: Specifies if WinZip Image Manager is available or not.
  • DISABLEPDFUTIL: Specifies if WinZip PDF Express is available or not.
  • DISABLESBKUPUTIL: Specifies if WinZip Secure Backup is available or not.
  • DISABLEDIPUS: Controls updates for applets.
  • ADDDESKTOPICON: Lets you add a desktop icon (applies to WinZip and the applets).
  • ADDFILEASSOCIATION: Provides options for file format associations and the Open With menu.
  • ADDSTARTMENU: Lets you add the applets to the Start menu (applies to WinZip and the applets).
  • INSTALLBGDDPrevents the duplicate file finder from being installed.
  • DISABLESHAREA: Disables WinZip SafeShare.
Disable the policies by double-clicking on each one and changing its value to 1.

Here i change the value to 1 on DISABLEIMGUTIL (Image Manager), DISABLEPDFUTIL (PDF Express) and DISABLESHAREA (SafeShare).


Finally close the Registry Editor.


2.    WinRar


When you install WinRar, it adds the following items to the context menu:
# Extract files
# Extract here
# Extract to <folder\>
# Extract here
# Extract each archive to separate folder
# Open with WinRar (for SFX archive)
# Add to archive
# Add to <archive name>
# Compress to <archive name> and email
# Compress and email

When installing WinRar for the 1st time, it will offer context menu item option to be added towards the end of installation.

But if you already have installed WinRar, use the settings on the options tab of WinRar program to remove those entries.

Open WinRar software.

Click options tab and then click settings to open setting dialog.


Switch to the integration tab and then click contect menu items.
Now uncheck the items that you don't want to see in the context menu and finally click OK button to complete the changes.


Beside disable the context items you can also use cascading context menu. Goes back to the integration tab and enable cascaded context menus.


3.    DropBox

https://www.dropboxforum.com/t5/Dropbox-ideas/Add-an-option-to-remove-Dropbox-items-from-the-desktop-context/idi-p/109723/page/5#comments

DropBox has added cluttered context menu in recent versions like 9 items which is too many. Till now they are not even prepare to add cascading menu yet. 😢

In the meantime, short windows 10 fix (thanks to @Laurence D.2 above)---


1. Open registry editor (search, regedit)

2. Paste in the registry editor address bar:  HKEY_CLASSES_ROOT\*\shellex\ContextMenuHandlers\DropboxExt

3. Right-click the key in that folder, rename the value.  That removes all dropbox entries from context menu.

(You can export the folder by right-clicking it before and after your changes, if you wish, you can change it back anytime and the context menu entries will appear again)


4.    PDFCreator


https://www.sebastian-segerer.de/post/remove-items-from-context-menu/


There is a suggestion to remove the context menu in PDFCreator software. But it doesn't work.

No solution has been found yet.


New context menu


Now the context menu is much more better than before.

Monday, 29 August 2022

How to change the total no of pages to print in Excel 2013

Sometimes you may want to do a quotation in Excel and make the 1st page as cover page. Than you print the page no and total page no starting from page 2. But you will need to start the page no as 1 in  the 2nd page.

For example, you do this by inserting the page no & total pages in the header/footer starting from page 2  to page 4 with the following code.

"Page &[Page] of &[Pages]" where [Page] is the page no & [Pages] is the total page no. 


Hence the print preview on the 2nd page.


However you will need 2nd page to print as page 1 and the total pages is 3 instead of 4. 1st page (cover page is not counted).

To overcome this set focus on 2nd page, open the page setup in the PAGE LAYOUT.


Change the First page number from Auto to 1. Click ok.

Next open the header/footer, to reduce a total page type -1 after the &[Pages].


However make sure to add a blank line after that. Otherwise the result is weird.

Hence the new preview on 2nd page.


Saturday, 4 June 2022

Cannot see shared computer in network and sharing center

Local area networks is one of the most powerful features available in modern computing that allow to share movies or music or data files across all the devices in your home or office. The network can be set  up for a server, share printers and scanners or just to share files among computers.

When the computers are connected together in a network you can see the computer which has shared folders in network and sharing center.

However a common problem is the inability of one computer to see shared folders on another computer or vice versa.

Usually the common causes of it is the incorrect setup.

Once the sharing has been set up you should be able to access the shared folders from another computer. Open Windows Explorer, select Network from the left pane, select the file and log in using your credentials.

However if you still cannot see the shared computer perform these checks.

1.    Make sure your computers are using the same network and IP version, i.e. IPx4 or IPx6. Most home networks use IPv4.

2.    Make sure Network discovery is enabled on all computers and make sure all the setting is the same in all computers.


3.    Make sure File and Printer sharing is enabled on all computers.

4.    Toggle Turn on password protected sharing to off and retest.

5.    Make sure you are logging in using the same account you entered when you added users to Share with.

6.    If you use Windows Defender firewall, open the Firewall app, select Allowed apps and ensure File and printer Sharing is allowed to pass.


7.    Make sure computer description is not empty. Check the computer description in system properties. 


For Win10 open Setting\System\About\Rename this PC in the middle.


Friday, 3 June 2022

BCD (Boot Configuration Data) - How to set boot entry

Windows Boot Manager (BOOTMGR) is a utility that boots operating systems. If you have several operating systems, you can enable Windows Boot Manager when the computer boots and then select the target operating system.

To add more operating systems to the boot manager refer to How to Multi-Boot Two or More Versions of Windows

Boot manager started since Windows 7. This is how the Windows 7 boot manager looks like.


The boot manager has changed its look since Windows 8 and beyond.


When a new operating system has been added, the computer will start booting from the new boot manager of the latest operating system. The default boot entry will be set to the new operating system also (refer diagram below). If it is necessary to reset the boot manager back to the previous operating system.


How to set default boot entry

I am using Windows 7 as the 1st and Windows 10 as the 2nd booting option.

I prefer to use Windows 7 as the default boot manager because Windows 10 is used as software test platform. Sometimes it is necessary to reinstall Windows 10 again because some test software might corrupt the Windows 10. 

Below is the example to set the default boot manager back to Windows 7

www.backupassist.com/blog/how-to-fix-boot-issues-with-bcdboot

Make sure Windows 7 is the current running operating system. 

18/Nov/2024 Not neccessary to boot into Windows 7 in order to set the boot loader to Windows 7 itself. A Windows 11 was installed & Windows 11 boot loader was used but when Windows 7 was login few seconds later it will stop and display the blue screen.

Setting the boot loader to Windows 7 using "bcdboot (drive no using list volume of diskpart for Win 7):\windows" manage to start Windows 7 normally.

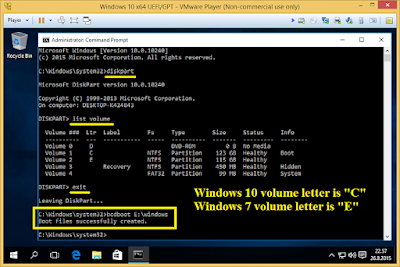
Open the command prompt and run as administrator. Run diskpart. Find out which volume belongs to Windows 7. For this case the Windows 7 volume is 'E'. Exit diskpart and type "bcdboot e:\windows" than enter. Now command prompt should show message "boot files successfully created".


How to remove boot entry

docs.microsoft.com/en-us/windows-server/administration/windows-commands/bcdedit

BCDEdit – Guide for Windows Vista, 7, 8, 10

BCDEdit is a command-line tool for managing BCD stores and the primary tool for editing the boot configuration of Windows Vista and later versions of Windows. It is included with the Windows Vista distribution in the %WINDIR%\System32 folder

Administrative privileges are required to use BCDEdit to modify BCD.

Syntax

bcdedit /command [<argument1>] [<argument2>] ...

Open the command prompt and run as administrator. Type "bcdedit" without argument is to list the computer's current BCD configuration.

To delete a boot entry type "bcdedit /delete {identifier}"


How to add a new operating system to the boot manager

Insert a bootable Pendrive or DVD of the Windows version to install and restart the computer. Let it boot from the external device.

Choose all the default setting when prompted until the selection of Windows installation type. Then choose Custom - New installation and select the partition to install the Windows. Wait for the installation to be completed.

Note: After the installation the computer will use the boot manager of the latest Windows.


How to add an existing Windows to the boot manager

Boot into the default Windows, open the command prompt, run as administrator, Type "bcdedit /copy" to make a copy of the current boot entry.

Type "bcdedit /copy {current} /d "Windows name" and then pressing the "Enter" key. 

The new boot entry will be added to the boot manager. Type "bcdedit" again without any parameter to see a list of boot entry. The new boot entry is still boot to the current Windows, ie partition C:. Take note on the new identifier, device, description and osdevice . Use /set to change the setting in the new boot entry to boot from the target Windows. For example, if the target Windows is in partition K, change the device and osdevice to "partition=K:".

bcdedit /set {identifier} device partition=K:
bcdedit /set {identifier} osdevice partition=K:
bcdedit /set {identifier} description "Windows 10 Pro x64"

Restart the computer. The new boot entry should work now. 

System Reserved partition - Space not enough

What Is the System Reserved Partition and Can You Delete It?

Windows 7, 8, and 10 create a special “System Reserved” partition when you install them on a clean disk. Windows doesn’t normally assign a drive letter to these partitions, so you’ll only see them when you use Disk Management or similar utility.

The System Reserved partition contains two important things:

  • The Boot Manager and Boot Configuration Data: When your computer starts, the Windows Boot Manager reads the boot data from the Boot Configuration Data (BCD) Store. Your computer starts the boot loader off of the System Reserved partition, which in turn starts Windows from your system drive.
The System Reserved partition consumes 100 MB of space on Windows 7, 350 MB of space on Windows 8, and 500 MB of space on Windows 10.

During the new Windows installation when the target partition has enough disk space but the Windows keep refusing to install because it claim the system space is not enough, reboot to the working Windows, ie Windows 7, and shrink the Windows partition or any partition by 500MB then add extra size to the system reserved partition. Now the installation should works fine.

Link for more info about Windows Boot Manager

How to Delete a Desktop icon with no properties

  In October 2024, I enabled Windows Subsystem for Linux (WSL) and installed Ubuntu on my Windows 10 system for an AI test project from Yout...