Windows Boot Manager (BOOTMGR) is a utility that boots operating systems. If you have several operating systems, you can enable Windows Boot Manager when the computer boots and then select the target operating system.
To add more operating systems to the boot manager refer to How to Multi-Boot Two or More Versions of Windows
Boot manager started since Windows 7. This is how the Windows 7 boot manager looks like.
The boot manager has changed its look since Windows 8 and beyond.
When a new operating system has been added, the computer will start booting from the new boot manager of the latest operating system. The default boot entry will be set to the new operating system also (refer diagram below). If it is necessary to reset the boot manager back to the previous operating system.
How to set default boot entry
I am using Windows 7 as the 1st and Windows 10 as the 2nd booting option.
I prefer to use Windows 7 as the default boot manager because Windows 10 is used as software test platform. Sometimes it is necessary to reinstall Windows 10 again because some test software might corrupt the Windows 10.
Below is the example to set the default boot manager back to Windows 7
www.backupassist.com/blog/how-to-fix-boot-issues-with-bcdboot
Make sure Windows 7 is the current running operating system.
18/Nov/2024 Not neccessary to boot into Windows 7 in order to set the boot loader to Windows 7 itself. A Windows 11 was installed & Windows 11 boot loader was used but when Windows 7 was login few seconds later it will stop and display the blue screen.
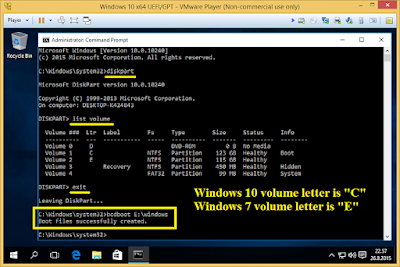
Setting the boot loader to Windows 7 using "bcdboot (drive no using list volume of diskpart for Win 7):\windows" manage to start Windows 7 normally.
Open the command prompt and run as administrator. Run diskpart. Find out which volume belongs to Windows 7. For this case the Windows 7 volume is 'E'. Exit diskpart and type "bcdboot e:\windows" than enter. Now command prompt should show message "boot files successfully created".

How to remove boot entrydocs.microsoft.com/en-us/windows-server/administration/windows-commands/bcdedit
BCDEdit – Guide for Windows Vista, 7, 8, 10
BCDEdit is a command-line tool for managing BCD stores and the primary tool for editing the boot configuration of Windows Vista and later versions of Windows. It is included with the Windows Vista distribution in the %WINDIR%\System32 folder
Administrative privileges are required to use BCDEdit to modify BCD.
Syntax
bcdedit /command [<argument1>] [<argument2>] ...
Open the command prompt and run as administrator. Type "bcdedit" without argument is to list the computer's current BCD configuration.
To delete a boot entry type "bcdedit /delete {identifier}"
How to add a new operating system to the boot manager
Insert a bootable Pendrive or DVD of the Windows version to install and restart the computer. Let it boot from the external device.
Choose all the default setting when prompted until the selection of Windows installation type. Then choose Custom - New installation and select the partition to install the Windows. Wait for the installation to be completed.
Note: After the installation the computer will use the boot manager of the latest Windows.
How to add an existing Windows to the boot manager
Boot into the default Windows, open the command prompt, run as administrator, Type "bcdedit /copy" to make a copy of the current boot entry.
Type "bcdedit /copy {current} /d "Windows name" and then pressing the "Enter" key.
The new boot entry will be added to the boot manager. Type "bcdedit" again without any parameter to see a list of boot entry. The new boot entry is still boot to the current Windows, ie partition C:. Take note on the new identifier, device, description and osdevice . Use /set to change the setting in the new boot entry to boot from the target Windows. For example, if the target Windows is in partition K, change the device and osdevice to "partition=K:".
bcdedit /set {identifier} device partition=K:
bcdedit /set {identifier} osdevice partition=K:
bcdedit /set {identifier} description "Windows 10 Pro x64"
Restart the computer. The new boot entry should work now.
System Reserved partition - Space not enough
What Is the System Reserved Partition and Can You Delete It?
Windows 7, 8, and 10 create a special “System Reserved” partition when you install them on a clean disk. Windows doesn’t normally assign a drive letter to these partitions, so you’ll only see them when you use Disk Management or similar utility.
The System Reserved partition contains two important things:
- The Boot Manager and Boot Configuration Data: When your computer starts, the Windows Boot Manager reads the boot data from the Boot Configuration Data (BCD) Store. Your computer starts the boot loader off of the System Reserved partition, which in turn starts Windows from your system drive.
The System Reserved partition consumes 100 MB of space on Windows 7, 350 MB of space on Windows 8, and 500 MB of space on Windows 10.
During the new Windows installation when the target partition has enough disk space but the Windows keep refusing to install because it claim the system space is not enough, reboot to the working Windows, ie Windows 7, and shrink the Windows partition or any partition by 500MB then add extra size to the system reserved partition. Now the installation should works fine.
Link for more info about Windows Boot Manager


