Sunday, 24 November 2019

Html help workshop does not show images after compiled

I use Word to create the HTML files. Any images dragged and inserted into the help pages will be stored in a sub folder of the same name with the help file.

The reference to the images in the HTML source include the correct sub-folder name and file name (nothing seems to be wrong there).

If the image source is PNG format, another same image name with GIF format will be created.

Now i compile the project into a .chm file and i cannot see any images. Also, the HTML Help Workshop compiler statistics show the correct number of images processed.

Word could have adds some HTML help-incompatible markup to the HTML files that save as Web Page facility. A simple fix to this is to save the file as type Web Page, Filtered (*.htm,*.html).


Thursday, 14 November 2019

HTML Help Workshop - Add more tabs & buttons

The HTML Help Workshop will compile chm help file by default only with Contents and Index tab and Hide, Back, Print and options buttons.

To add Search tab, click the side bat button 'Change project options' , click Compiler on top bar and then enable 'Compile full-text search information'.


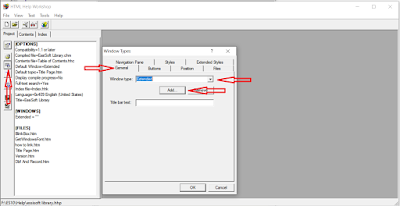
To add Favourites tab, click the side bar button 'Add/Modify window defination'. In general tab, enter a Window type description and click 'Add'. Take note once the Window type has been added, it cannot be removed. Make sure to use a proper name.


Then click Navigation tab and enable Favourites tab.


To add the buttons, click the Buttons tab and enable Forward, Refresh, and Locate button.


File association in Windows 10

Windows can only open one program for a particular file type, file extension, automatically. 

So if you like to work with your PNG files in Photoshop Elements, for example, and not Paint, changing the default file association for PNG files is required.

Usually if you double click on a file in the folder and the application will be started if it is not open yet or will be opend by that application.

However, sometimes the double click doesn't work even though the file can be opened by the application itself.

Today while I was checking for a file type belongs to another application in the registry using Regedit.exe, I accidently found the problem why that file type, .prg, cannot be opened by the associated application when double click.

In was a glitch in the registry that the file type 'prg_auto_file' was associated to 3 unreadable registry keys. Remove those 3 unreadable and restart Windows resolve the issue.

16/May/2020 Update

Same thing has happened today again. The prg file associated with Med cannot be opened by double click or drag to Med file area.

Run RegEdit to check .prg_auto_file and those unreadable registry keys are not there. 


Delete these 2 keys in the classes root

1. Computer\HKEY_CLASSES_ROOT\.prg
2. Computer\HKEY_CLASSES_ROOT\.prg_auto_file

Restart the computer. The data value of ProgId in the UserChoice

Computer\HKEY_CURRENT_USER\Software\Microsoft\Windows\CurrentVersion\Explorer\FileExts\.prg\UserChoice will change automatically from

'.prg_auto_file' -> 'Applications\\medcx.exe' and this will solve the problem.


How to boot VMware Workstation Virtual Machine from USB Drive

Software : Windows 10 Pro & VMware Workstaion 15

Hardware : Intel i5-6400 2.70Ghz, 16GB, ASUS B150 PRO GAMING D3

VMware does not support boot from USB drive. The solution is to add an additional hard disk drive and point the USB drive as a phisical disc to the newly added drive. Then change the BIOS boot options to bootfrom the newly added hard drivce.

First step is to check the USB Drive #. Plug in the Win 10 bootable USB drive. In this computer it is Drive K.


Then open command prompt by run as administrator. Type 'diskpart' and then 'list disk'. 


Here the USB drive is 'Drive 2' 28 GB. Take note on that.

Next add the USB to VMware. Open VMware, cick on the 'Edit virtual machine settings' for the hosted OS. Click 'Add' on hardware. Make sure default Hard Disk is selected and click 'Next'.

In the next Disk Type click Next to stay as SCSI. Enable Use a physical disk and click Next. Then next choose PhysicalDrive2 (USB Drive #) and Use entire disk for Usage. In the last window click Finish to complete the adding of USB Drive.


Finally, Click VM on the hosted OS and choose Power On to Firmware in the Power menu to boot into computer BIOS.

When the firmware window appear, use arrow key to choose EFI VMware Virtual SCSI Hard Drive (1.0) to boot from


The final screen booting into Windows setup from USB Drive.


VMware Workstation unable to start

Software : VMware Workstation 15, Windows 10 Pro and host OS Windows 10 Pro, Windows 7 Ultimate and Windows XP SP3.

Hardware : Intel i5-6400 2.70Ghz, 16GB, ASUS B150 PRO GAMING D3
When the host Win 7 or Win XP is power on, an error message pop up saying

'This host supports Intel VT-x, but Intel VT-x is disabled'

A further google search in https://www.howtogeek.com/213795/how-to-enable-intel-vt-x-in-your-computers-bios-or-uefi-firmware/ show that modern CPUs include hardware virtualization features that help accelerate virtual machines created in VirtualBox, VMware, Hyber-V and other apps. But this features aren't always enable by default especially on Intel CPUs.

For this case the VMware hardware acceleration features Intel VT-x built into the Intel CPUs needs to be enable in the ASUS BIOS.

Finally turning VT-x on in the BIOS manage to start the hosted OS.


Tuesday, 12 November 2019

HTML Help Workshop Error

HTML Help Workshop and Windows 10

1.  Compiled error HHC6003

When run the HTML Help compiler gave an error code HHC6003.

From Google search the error code was referencing to file itcc.dll was not registered. To register the file,  open the command prompt in administrator mode. Type the command below in the Dos prompt.

regsvr32 C:\Windows\System32\itcc.dll


2.  Error saving project file .hhp

When trying to save a project, the following error message:

Cannot write to the file ""myfilename.hhp"".

This has something to do with the quotes. It is also the same problem when trying to compile the project with the 'Save all files before compiling' button enabled. The HTML Help put quotes around the file name as a result it became double quotation marks.

This is a registry glitch that cause the project path to be displayed in quotation marks in the compilation dialog box. To fix the problem in the registry, use regedit and find those hhp shell open command and delete the quotation marks in the project path.

Before "C:\Program Files\HTML Help Workshop\hhw.exe" "%1"


change to

After "C:\Program Files\HTML Help Workshop\hhw.exe" %1

Close and restart HTML Help Workshop again. This should do the trick.

Sunday, 3 November 2019

Wifi disconnects when charger cord is plugged in

Recently my son has noticed that his laptop is running slow/lag. Than he reset his Asus laptop A550J i5 12GB Windows 10 (upgraded from Windows 8) using Settings->Recovery->Reset this PC->Get started & choose the option 'Remove everything'.


The Windows 10 was then reset to a fresh start/Clean install and the speed is back to normal. Then he install the online game and was able to access to internet connecting to my home modem router and continue to play the game.

However, after a while, he notice that the wifi will be disconnected when he stop the game for a rest. He has to reconnect wifi again in order to continue to play the game. This has caused some inconvenience. So he ask for my help.

At first i check the wifi signal strength by moving the laptop to different location around the router to verify whether its a signal weak effect. But the wifi did not disconnect. Than i upgrade the router wifi protected access from WEP to WPA2 just maybe Windows 10 latest version may need more security encryption. However it does not help either.

Next i disable all the softwares that auto start with Windows. That has not disconnect the wifi either. While all possible computer related fix has been tried,  i start looking at hardware interference. So i remove all electronic items and components further away from the laptop. Started with the power bank, mobile phone, headphone, earphone, lamp, cooling fan till the laptop power adapter.

Than i realise when the power cord has plugged in for charging, the wifi will get disconnected as long as there is no software requesting for online service. For ezample, during when my son is playing online game (constantly request data from game server), the wifi did not disconnect. Only when he stop playing than the wifi will get disconencted.

More test have also confirmed that the wifi will be disconnected no matter which hotspot the laptop is connected to, the router or mobile handphone.

Now we know the actual cause. So i ask my son to try to use USB tethering connection from the mobile phone to see if has the same problem. But the next day my son has informed me that he has solved the problem by using the Network reset in Network status. Right click on Network Internet access in taskbar, click Open Network & Internet settings.


This network reset has solved the problem in my son laptop wifi get disconnected when power cord is plugged in.

From this experience there are 2 things that have been learn in Windows 10 which is itself and the network can be reset. Similar to re-installation for Windows 7 and remove and re-install the network driver.

Friday, 5 July 2019

Error opening Help in Win 10: "Feature not included" or "Help not supported"

How to open .HLP files in Win 10

After upgrade from Win 7 to Win 10, while 2 days ago i was trying to continue with my program development, i have realised the programming .HLP files can no longer open. So as usual i google for more info and have found out Win 10 does not support .HLP files.

Info from the internet has suggested that many solutions are available.

https://windowsreport.com/open-hlp-files-windows-10/

https://answers.microsoft.com/en-us/windows/forum/windows_10-files/cant-open-hlp-files-with-windows-10/55ce10b8-e865-4c68-b2c8-c62318fe39b7

The 1st method is to decompile the hlp file (use HelpNDoc6 ) and than compile it to chm (use HTML Help Workshop) from Microsoft. However, i have encountered many problem like error in decompile large hlp file and unable to compile to chm file because of the following.

https://stackoverflow.com/questions/54219263/windowshelp-to-htmlhelp
http://www.help-info.de/en/Help_Info_WinHelp/hw_converting.htm

HelpNDoc6 cannot decompile a large 4.7MB hlp file.

Refer to http://www.help-info.de/en/Help_Info_WinHelp/hw_converting.htm, this site has suggested to use automatically create contents file (.hhc) when compiling but still doesn't work. Trying another method to use HHPmod to finishing up the HH workshop conversion finally able to create chm but the content is missing.

Also take note on this, sometimes there are problems using the context menu of a *.hhp file from Windows Explorer. (Open with Microsoft HTMLHelp Workshop). A DOS path quotation is the cause. Start HTMLHelp Workshop from the Start menu and use File | Open.

And converting from Winhelp to HTML Help leaves Bitmaps Behind. When you use the HTML Help Workshop to convert a Winhelp project to an HTML Help project, bitmaps in the .rtf files are not transferred to the HTML Help .htm files.

In addition when migrating from WinHelp to HTMLHelp there seems to be an issue with context sensitive help. It appears all this information is lost when converting is done?

The 2nd method is to convert hlp to PDF. This is a relatively simple procedure. But PDF does not has a contents menu and a index input column for wild search.

The 3rd method is to replace winhlp32.exe and winhlp32.exe.mui (for error 9009 which is to require for localization in your own language) from Win 8. Download 'Windows8.1-KB917607-x64.msu'. Do not install because it will display the update incompatibility message.


https://www.tenforums.com/general-support/16982-cant-read-older-hlp-files-windows-10-a-5.html#post529881 (post #46)

https://www.tenforums.com/general-support/16982-cant-read-older-hlp-files-windows-10-a-10.html (post #96)

https://www.tenforums.com/general-support/16982-cant-read-older-hlp-files-windows-10-a-6.html#post578103 (post #57)

https://www.tenforums.com/general-support/108565-how-open-old-hlp-files-windows-10-a.html (Search for a ready to download Help.rar to install winhlp)

https://www.trishtech.com/2015/12/how-to-open-hlp-winhelp-files-in-windows-10/

Now follow closely to this site https://blog.spectologic.com/2015/09/09/using-hlp-files-in-windows-10/. Some steps i use command prompt like taking ownership and other i use software ZipWare to extract files.

Extracte the content of 'Windows8.1-KB917607-x64.msu' to a temp folder (i create ContentMSU in Drive O) with ZipWare (freeware).

Create subfolder ContentCAB in ContentMSU and extract content of 'Windows8.1-KB917607-x64.cab' to ContentCAB. Go to ContentCAB to find subfolder amd64_microsoft-windows-winhstb.resources_31bf3856ad364e35_6.3.9600.20470_en-us_c3a9a33a1aee3495 as 'en-us' is my language settings. Go to the subfolder we will find 'winhlo32.exe.mui'. We need to replace %SystemRoot%\en-us\winhlp32.exe.mui (C:\Windows\en-us\winhlp32.exe.mui) with the new file.

In command prompt, change directory to c:\Windows\en-us. Than take ownship for winhlp32.exe.mui by command

https://helpdeskgeek.com/windows-7/windows-7-how-to-delete-files-protected-by-trustedinstaller/

takeown /f "winhlp32.exe.mui"

takeown /F <file_name> [/S <RemoteComputerName>] [/U <Domain\DomainUserName>] [/P <UserPassword>] [/A] [/R [/D prompt]]
Parameters of the takeown command:

/F <file_name>. Here you must specify the full path to the file or directory whose owner you want to change. You can use the wildcard character

https://theitbros.com/using-takeown-exe-command-to-take-ownership-of-file-or-folder/

Grant full control permission to winhlp32.exe.mui

icacls "winhlp32.exe.mui" /grant "%UserName%":F

https://ss64.com/nt/icacls.html

Rename existing winhlp32.exe.mui

ren winhlp32.exe.mui winhlp32.exe.mui.w10

Copy new winhlp32.exe.mui to current en-us folder.

copy O:\ContentMSU\ContentCAB\amd64_microsoft-windows-winhstb.resources_31bf3856ad364e35_6.3.9600.20470_en-us_c3a9a33a1aee3495\winhlp32.exe.mui winhlp32.exe.mui

(You can open windows folder to copy the file instead of typing command in command prompt)

For winhlp32.exe, it is the same procedure except source folder is C:\Windows

In command prompt, change directory to c:\Windows. Than take ownship for winhlp32.exe.

takeown /f "winhlp32.exe"

Assign permission to winhlp32.exe

icacls "winhlp32.exe" /grant "%UserName%":F

Rename existing winhlp32.exe

ren winhlp32.exe winhlp32.exe.w10

Copy new winhlp32.exe to current c:\Windows folder.

copy O:\ContentMSU\ContentCAB\amd64_microsoft-windows-winhstb_31bf3856ad364e35_6.3.9600.20470_none_1a54d9f2f676f6c2\winhlp32.exe winhlp32.exe

(Like above, You can open windows folder to copy the file instead of typing command in command prompt)

Now the hlp files should open successfully.

Thursday, 27 June 2019

How to add WinRAR ZIP archive to Right Click context menu 'New' in Win 10

With WinRAR installed, the Window context menu 'New' will have option for WinRAR archive. Select this option will create new RAR file ready for adding archive.

To disable it, open WinRAR (Run it from C:\Program Files (x86)\WinRAR\WinRAR.exe if there isnt any shortcut) and choose Option -> Settings -> Integration than untick Integrate WinRAR into shell.


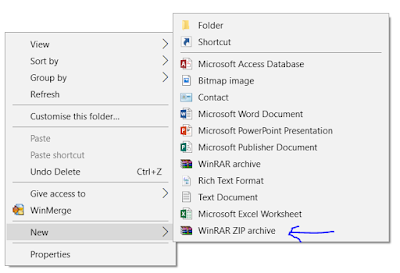
WinRAR also has another option to create archive, in zip format. But it is not added in the context menu. To add this entry to the context menu, i am using the window registry.


Open Window search box and type 'regedit'. Run regedit.exe when you see the command. Go to CLASSES_ROOT and find filetype '.rar' than click ShellNew to see the key FileName and data. Right click to modify FileName and copy the vaslue data 'C:\Program Files (x86)\WinRAR\rarnew.dat'.


Scroll down to find filetype '.zip'. Right click on '.zip' to add new key 'ShellNew'. Right click ShellNew to add a new string value. Change the value name to 'FileName' and paste the copied data just now to value data. Change the value data rarnew.dat to zipnew.dat. This will add ZIP option for New menu in Windows Explorer right click context menu. 

Quit the regedit.exe. If you don't see the new ZIP option now, restart the computer.

Wednesday, 26 June 2019

Synchronize folder timestamps

Now i have moved my working platform (Win7 x86) used for the last 10 years to newer machine (Win10 x64) and have used ViceVersa Pro to synchronize all the required directories and files in the partitions to the new machine.

All the softwares installed on the Win7 machine have been installed the same (some still use x86 version because x64 is not available and other download latest x64 version) to the new Win10 machine.

However, even though the timestamp for the files were synchronized correctly but not the folders. Most of the timestamp  in the new folder used the date and time when it was synchronized. This is not good because this group of folders (same timestamp) cannot tell the work progress by time.

Than the same miricle in google i came to this website providing the trick using robocopy which i did try some years ago but failed.

http://www.aionsolution.com/it-support/windows-7/robocopy-a-hint-for-those-with-folder-timestamp-issues-after-syncing/

Hence this is the command.

robocopy "(source") "(destination)" /dcopy:t /copy:t /s /log:(drive letter e:)mylog.txt /NDL


However there is a catch. The command will only syn the date modified and usually the folder detail viewer will only show a date column which does not match with the date modified. I do not know why but you only need to right click the folder viewer heading in order to show the date modified column for syn confirmation.

To generate mylog.txt greatly helps to determind whether there is error for the robocopy command. If mylog.txt has been created instantly, than there is some error.

Now my new folders are syn with the correct timestamp. However, some folders timestamp remain at the last syn timestamp when i moved from WinXp to Win7 and i did not manage to correct it.

Tuesday, 11 June 2019

PDFCreator does not print

This utility program is very stable (with many version updated) even on my upgraded Win 7 x86 computer but the last working version on my Win 7 is v2.2.2 released on Feb 2016.

Any following new version does not work on my computer because whenever i launch a print, the pdf file is not generated. The printer print test page function does not generate anything as well.
I cannot find any solution or repair advise therefore I have to revert PDFCreator back to v2.2.2 in order to continue using at least a working copy for myself.

Today while i am upgrading my Windows platform from 7 x86 Intel Duo Core to 10 x64 Intel i5 (different computer hardware), i try to upgrade PDFCreator to the latest version to see if the problem has been solved.

To my surprise the latest v3.5.0 still continue to refuse to generate pdf file. As a result i try to google for a fix and landed on this site https://forums.pdfforge.org/t/pdfcreator-simply-will-not-print-help-needed/12715/7.

The user has reported problem that's the same issue on me. A support staff name Robin seems to point to the root of the problem, the security permissions at the PDFCreator spool folder is not configure correctly. So i check on the spool folder properties, "%USERPROFILE%\AppData\Local\Temp\PDFCreator\Spool", and the full control access right was not enable/allow. Refer to screenshot below.


After that i edit the SYSTEM and Administrators user's permissions to add with full control. Then the PDFCreator v3.5.0 is finally able to generate a pdf file now.


Update 25 Jun 2019

The same thing has happened again. PdfCreator does not generate pdf file. Apply the same Full control permissions to SYSTEM & Administrator in "%USERPROFILE%\AppData\Local\Temp\PDFCreator\Spool" and the problem disappear.

Update 28 Dec 2022

The same thing has happened again on Win10 and PdfCreator 4.2.0. However the Print PDFCreator Test Page is working, unlike the problem on Win 7 and PdfCreator 2.2.2. The same solution apply again which is to add full control permissions to user "Administrator" at the PDFCreator Spool folder. 

Side note 
The Save setting on PdfCreator 4.2.0 was set to Automatic and unique filenames was enable. This setting will not popup the save dialog.


To allow save dialog to show, change the save setting to Interactive in which the setting for ensure unique filenames will be removed also. Finally remember to click Save button to activate the changes.


The setting to activate RSS news feed and send usage statistic is disable also.


Wednesday, 3 April 2019

Windows 7 menu or context menu item will re-appear again shortwhile after clicking

Last update 15/Nov/2019

Long time ago i have noticed that whenever i click a menu in my xbase ++ customized program i always see the same menu item re-appear again in split seconds near the oroginal menu item screen location.

At 1st i thought it was some defect in the xbase ++ compiled program but today the same thing happened with my editor MED CX when i try to paste a string with the context menu.

As a result, i google for more info and have found a youtube with the link below

https://www.youtube.com/watch?v=sIvpiq9Ba0I

It is the 'Fade out menu items after clicking' in the Performance Options->Vusual Effects that has caused the problem.

Below is the step to uncheck the option

1. Right click "My Computer: and click "Properties"
2. Click "Advanced System Settings" 
3. Under "Peformance" click "Settings" you should see that option. 

Uncheck the option and click 'Apply'. Thats it.


P/s: Windows 10 doesn't quite affected by this issue. 

Windows 10 – Right-Click Context Menu option is missing and Freeze/Hang

Recently, my Windows 10 has started freezing whenever open a file explorer and right-click on a PDF or image file. The context menu appears,...